
Azure's Free Tier seems like a great way to explore cloud services without spending money, but hidden charges can quickly catch you off guard. Here's what you need to know:
- Free Tier Overview: Includes £160 credit for 30 days, 12 months of free services, and over 65
always free
services. However, exceeding limits or using non-free services leads to immediate charges. - No Spend Cap: Azure doesn’t automatically stop billing once free limits are exceeded. Charges for extra usage or services not included in the free tier can add up fast.
- Common Hidden Costs:
- Deallocated Resources: Managed disks and unattached resources still incur charges.
- Data Egress: Transferring data out of Azure or between regions isn’t free.
- Monitoring Tools: Log Analytics and diagnostics often exceed free limits, leading to unexpected bills.
- Monitoring Challenges: Usage data is delayed by 1–2 days, making real-time tracking difficult. Budget alerts and regular audits can help.
To avoid surprises, plan resource usage carefully, set alerts, and regularly review your Azure account for unnecessary costs.
::: @figure 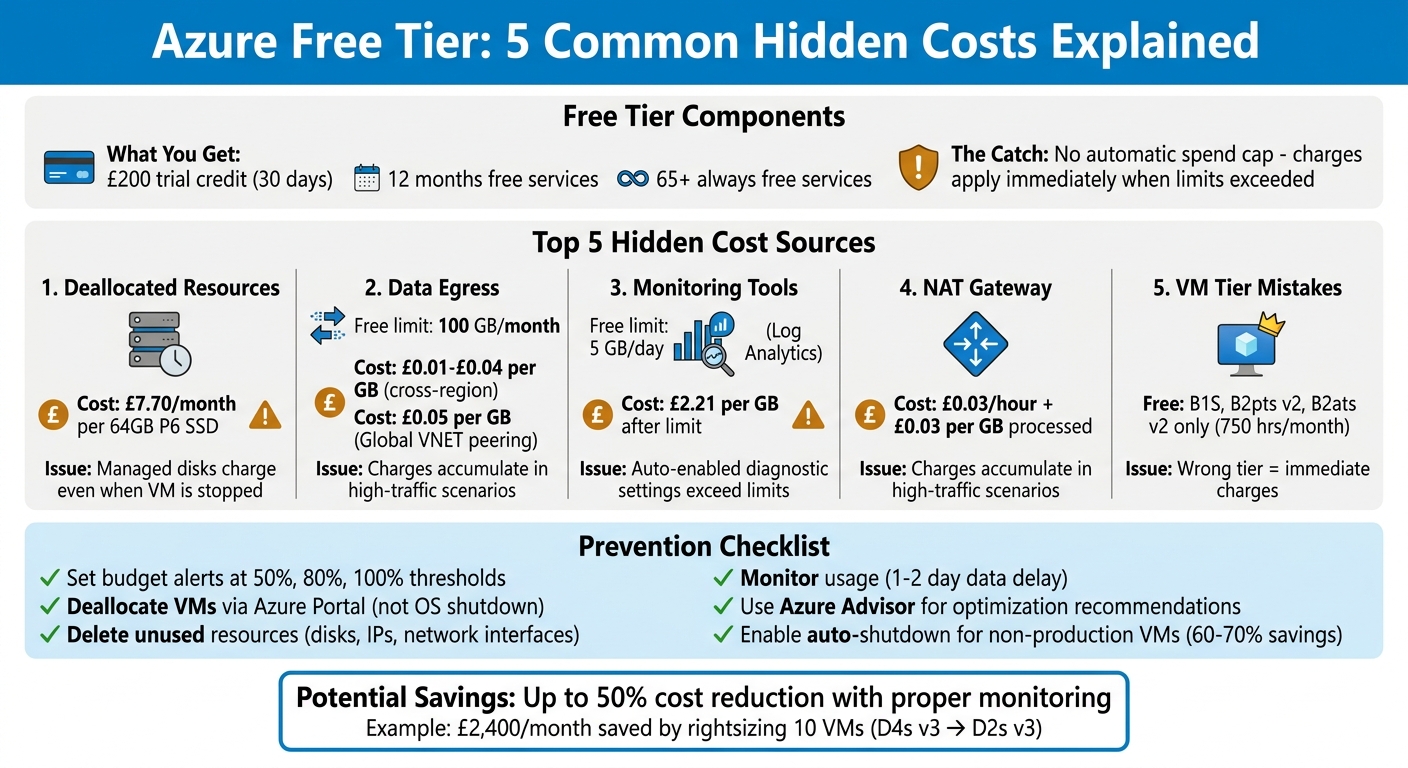 {Azure Free Tier: 5 Common Hidden Costs and Prevention Strategies}
:::
{Azure Free Tier: 5 Common Hidden Costs and Prevention Strategies}
:::
How Azure Free Tier Switches to Paid Services
Subscription Expiry and Automatic Billing
Azure's transition from free to paid services can catch users off guard if not closely monitored. Here's how it works:
When you sign up for Azure, you receive an initial credit of around £160, which is valid for 30 days. Once this credit is spent or the 30 days are up, your services are disabled unless you upgrade to a pay‑as‑you‑go plan [1][8].
Additionally, services offered for free during the first 12 months - like B1S virtual machines and Azure SQL Database - automatically switch to standard pay‑as‑you‑go rates when the free period ends [3][6]. If you're not paying attention, these services will keep running, and charges start piling up. Microsoft does send a notification before the free period ends, but these can sometimes be missed.
Some of the commonly affected services include burstable VMs like B1S, B2pts v2, and B2ats v2, which provide 750 free hours per month, as well as managed disks and Azure SQL Database. For example, after the free period, a B1S VM that was previously free will start incurring charges at regular rates. Even if a virtual machine is deallocated, a managed disk such as a 64 GB P6 SSD can still cost about £7.70 per month [3].
Missing Usage Caps and Warnings
Another area where unexpected costs can arise is when your usage exceeds the free-tier limits.
Once you switch to pay‑as‑you‑go billing, Azure does not impose a hard spending cap. This means that if you go over the free monthly limits or use services not included in the free tier, you'll start accruing charges immediately [3]. For instance, Log Analytics provides 5 GB of data ingestion per day for free, but any usage beyond that is billed at approximately £2.21 per GB. Unfortunately, there's no automatic mechanism to stop overages.
Azure does offer some tools to help track usage. The Free services
grid in the Azure portal shows statuses like Unlikely to Exceed
, Exceeds on \[Date\]
, or Exceeded on \[Date\]
[7]. However, this data is usually delayed by 1–2 days, meaning you won't see overages in real time. To avoid surprises, you can set up budget alerts in Cost Management. These alerts can notify you at thresholds like 50%, 80%, and 100% of a set amount - for example, £1 [3].
Need help optimizing your cloud costs?
Get expert advice on how to reduce your cloud expenses without sacrificing performance.
This Is How Azure Free Tier Actually Works
Common Sources of Hidden Costs in Azure Free Tier
Unexpected charges in Azure Free Tier often come from specific services and practices that aren’t immediately obvious.
Diagnostic and Monitoring Services
Logging and monitoring tools are frequent sources of unplanned expenses. While Azure offers free basic platform metrics and Activity logs, services like Azure Monitor charge for data ingestion and retention in Log Analytics workspaces and Application Insights [11][12]. The issue often arises when Diagnostic Settings, which may be automatically enabled by Azure Policies, stream all logs of a selected category into a workspace. This can quickly exceed free limits.
Cloud Engineer Ebby Peter highlights this challenge:
Diagnostic settings are a category selector, not a filter. You choose what type of log to collect, you don't choose which individual records within that type. That distinction costs teams thousands of dollars a month.[10]
For example, an Azure Firewall can generate tens of gigabytes of network rule logs daily. Most users default to the Analytics plan, which costs about £2.21 per GB after the first 5 GB (free limit) [3]. Additionally, the older AzureDiagnostics table bills all data ingestion at the highest rate, without offering cheaper pricing options [10].
Data Egress and Outbound Traffic Costs
Data transfer fees are another common source of hidden costs. While data entering Azure (ingress) is free, data leaving Azure - whether to the internet or other regions - incurs charges [13][14]. Azure provides 100 GB of outbound data transfer per month for free, but exceeding this limit results in billing [3].
Transferring data across regions can be expensive. For instance, moving data between West US and East US regions costs between £0.01 and £0.04 per GB [3]. Similarly, Global VNET peering in Zone 1 (North America/Europe) charges approximately £0.05 per GB because both ingress and egress are billed [9].
Networking services like Load Balancers and NAT Gateways also contribute to costs. A NAT Gateway, for example, charges £0.03 per hour plus £0.03 per GB of data processed [15]. These charges can add up quickly, especially in high-traffic scenarios.
Unattached or Deallocated Resources
Another common mistake is leaving resources in a state that continues to incur charges. For instance, shutting down a virtual machine (VM) from within its operating system doesn’t stop billing - it must be deallocated via the Azure Portal to avoid compute-related costs [3].
Managed disks are another overlooked expense. Deleting a VM doesn’t automatically delete its attached managed disks, which remain active and continue accruing charges. This is particularly problematic in test environments where resources are spun up and then forgotten.
Other unattached resources, such as network interfaces, public IP addresses, and reserved storage, also continue to generate costs. Regularly auditing resource groups is crucial to identify and remove these unused components before they inflate your bill.
How to Prevent and Monitor Hidden Costs
Avoiding unexpected charges requires action at every stage - before, during, and after deployment. Azure doesn’t automatically stop billing when free limits are exceeded, so staying on top of costs is crucial [1][3]. Let’s break down some practical steps to help you manage expenses effectively.
Pre-Deployment Planning
Before deploying resources, it’s essential to understand Azure’s cost structure. Azure offers three tiers: Always Free services (e.g., 25 GB Cosmos DB), 12-Month Free offerings (e.g., B1S VMs), and a £200 trial credit valid for 30 days [3]. Use the Azure Pricing Calculator to estimate costs, but take note - it might miss hidden charges like VNet peering (£0.01 per GB) or private links, so you’ll need to factor these in manually [16][18].
Check the Free services for 12 months
table in your Azure portal to understand specific meter limits before deploying any resources [7]. Additionally, ensure that virtual machines (VMs) are fully deallocated when not in use to stop billing [16][3].
Active Monitoring and Alerts
Once your resources are up and running, continuous monitoring is key to avoiding surprise bills. Set up budget alerts as soon as you create your account. Even a low threshold - like £1 - can trigger notifications when spending hits 50%, 80%, and 100% of that limit [3].
For better control, set multiple thresholds:
- 50%: Early warning to check usage.
- 75%: Review which services are driving costs.
- 90%: Prepare for immediate action.
- 100%: Take urgent steps to prevent overspending [19].
Use tagging policies (e.g., Project, Owner, CostCenter) to track which deployments are driving costs [17]. The Azure portal also features a Status
column for free services, showing whether a limit is Unlikely to Exceed
, Exceeds on \[Date\]
, or was Exceeded on \[Date\]
[7]. Keep in mind that usage data may have a one- to two-day delay, so billing dashboard updates might not reflect real-time changes [7].
Post-Deployment Optimisation
Regular reviews after deployment can help identify and eliminate unnecessary expenses. Look out for zombie
resources - these include unattached managed disks, unused network interfaces, or old storage snapshots that can still incur charges even after the primary service is deleted [16][17].
Azure Advisor, a free service, offers automated recommendations for optimising resources. For example, in March 2026, Medha Cloud’s CEO Sreenivasa Reddy G reported saving approximately £2,400 per month (£28,800 annually) by downsizing 10 D4s v3 VMs (4 vCPU, 16 GB) to D2s v3 (2 vCPU, 8 GB) in the East US region. Azure Advisor flagged that the original VMs were using less than 20% of their CPU capacity [20].
Another way to cut costs is by enabling auto-shutdown for non-production VMs. Automating shutdowns during nights and weekends can reduce these specific costs by 60% to 70% [17].
Azure Free Tier Limits and Expiry Mechanics
When using Azure's Free Tier, it's crucial to understand its limits to avoid unexpected charges. The free tier includes three main components: a £200 trial credit valid for 30 days, 12 months of free services, and Always Free services with specific monthly usage caps [2][3].
Monthly Limits and Usage Caps
The free tier offers 750 hours per month for Virtual Machines in specific burstable SKUs (B1S, B2pts v2, or B2ats v2), which allows you to run a Linux and a Windows VM continuously throughout the month [3][5]. However, these hours don’t roll over. For example, if you use only 400 hours in January, the remaining 350 hours won’t carry over to February.
Other services have their own caps. Azure Functions allows up to 1 million executions per month, while Azure Cosmos DB provides 1,000 Request Units per second and 25 GB of storage indefinitely [3]. The App Service F1 tier supports up to 10 applications but limits compute time to 60 minutes per day. Additionally, apps enter a sleep state after 20 minutes of inactivity. If you exceed these limits, Azure automatically switches to pay-as-you-go billing [1][3].
Carefully selecting the appropriate service tier is essential to maximise the benefits of the free tier, as detailed below.
Service Tier Restrictions
Only specific service tiers are eligible for free usage. Choosing a higher tier results in immediate charges [3][21]. For Virtual Machines, only the B1S, B2pts v2, and B2ats v2 instances are included in the free tier. Opting for other B-series or D-series instances incurs costs. Similarly, within the App Service, only the F1 tier is free - any upgrade leads to billing.
For SQL Database, only the Serverless tier qualifies for the free allocation of 100,000 vCore seconds per month [2][3]. In terms of storage, the free tier includes two 64 GB P6 SSD managed disks for 12 months. Adding a third disk or keeping the disks beyond the 12-month period will cost about £7.20 per month [3]. To avoid accidental charges, it’s advisable to create resources through the Free Services
page in the Azure Portal, rather than the general Create a Resource
menu [21].
Understanding these restrictions helps you plan your resource usage effectively and avoid unplanned costs.
Conclusion
Azure's Free Tier provides an easy entry point for cloud projects, but it's important to be aware of the costs that can quickly add up. Once free limits are exceeded, services automatically transition to pay-as-you-go rates, and expenses can escalate if not monitored carefully.
One common issue is unexpected charges from unused resources or exceeding free limits, with costs potentially increasing by up to 57% [4]. Even minor oversights can lead to surprisingly high bills, highlighting the need for diligent cost tracking and management.
To avoid these financial surprises, proactive measures are key. Setting budget alerts at various thresholds (50%, 80%, and 100%), routinely checking for unused resources, and keeping services within the same region can help keep costs under control. Understanding these hidden charges is essential for making the most of Azure's free-tier offerings while keeping expenses manageable. That said, navigating Azure's pricing structure can be time-consuming and complex.
For businesses finding it challenging to manage these costs, expert help can make all the difference. Hokstad Consulting offers tailored solutions, such as real-time cost dashboards, infrastructure optimisation, and automated monitoring, to help reduce Azure expenses by up to 50%. Their No Savings, No Fee
approach ensures you only pay when actual savings are achieved, making cost management simpler and more effective. Whether you're new to Azure or managing an established setup, expert support can turn unpredictable costs into a manageable and predictable part of your operations.
FAQs
How can I stop Azure billing once my free limits are reached?
To prevent Azure from billing you once you've hit the free tier limits, you can either disable or delete the resources causing charges. Azure offers a built-in spending limit feature, which automatically halts services once your included credit is fully used, ensuring no additional costs are incurred.
To stay in control and avoid unexpected charges, it's a good idea to regularly check your usage in the Azure portal. If you notice resources exceeding the free tier limits, you can manually stop or remove them. For free accounts, spending limits are activated by default, adding an extra layer of cost protection.
Why am I charged when a VM is shut down or deleted?
When you shut down a virtual machine (VM) in Azure but don’t deallocate it, you’ll still be charged because the platform continues to reserve compute resources. To avoid these charges, make sure the VM is fully deallocated, not just stopped. Additionally, deleting a VM doesn’t automatically remove associated resources, such as disks, which can still generate costs unless you explicitly delete them.
What’s the fastest way to spot hidden Azure Free Tier costs?
To stay on top of any unexpected Azure Free Tier costs, make it a habit to monitor your usage through the Azure portal. Pay close attention to how much of your free service allocation you’ve used, your spending patterns, and the costs of individual resources. Keep in mind that usage data might take 1–2 days to reflect after resources have been utilised.