
If I share a Kubernetes cluster across teams or customers, I need three things in place from day one: clear isolation, hard resource limits, and cost tracking per tenant. Without them, one noisy workload can hit performance, expose data, or push spend up fast.
At roughly $0.10 per hour per cluster, separate clusters can get expensive at scale. That is why many teams move to shared clusters. But the trade-off is simple: I save money and cut cluster sprawl, as long as I lock down access, segment traffic, cap usage, and track who is using what.
Here’s the short version:
-
Use the lightest isolation model that fits the risk
- Namespaces for trusted internal teams
- Namespaces plus policy controls for tighter internal separation
- Virtual clusters or sandboxed runtimes for higher-risk tenants
-
Lock each tenant down
- Namespace-scoped RBAC
- Default-deny NetworkPolicies
-
RestrictedPod Security Standards - Admission rules to block risky workloads
-
Stop noisy neighbours
-
ResourceQuotaper namespace -
LimitRangefor default requests and limits - Requests, limits, QoS, and
PriorityClass - Separate node pools for mixed workload types
-
-
Make scaling work in a shared cluster
- Keep HPA settings inside quota headroom
- Use VPA in recommendation mode first
- Use Cluster Autoscaler with care
- Put batch jobs on Spot pools where it fits
-
Track spend by tenant
-
Keep governance tight
- Standard tenant onboarding
- Central audit logs
- Access reviews
- Backup and restore tests with recorded RPO and RTO
A few numbers make the point. 88% of organisations use namespaces to separate apps in a cluster, while 37% still have half or more of their workloads needing rightsizing. That tells me the pattern is common, but resource control is still patchy.
If I had to sum the whole article up in one line, it would be this: shared clusters work well when I treat isolation, quotas, autoscaling, cost reporting, and audit as one joined-up system.
::: @figure 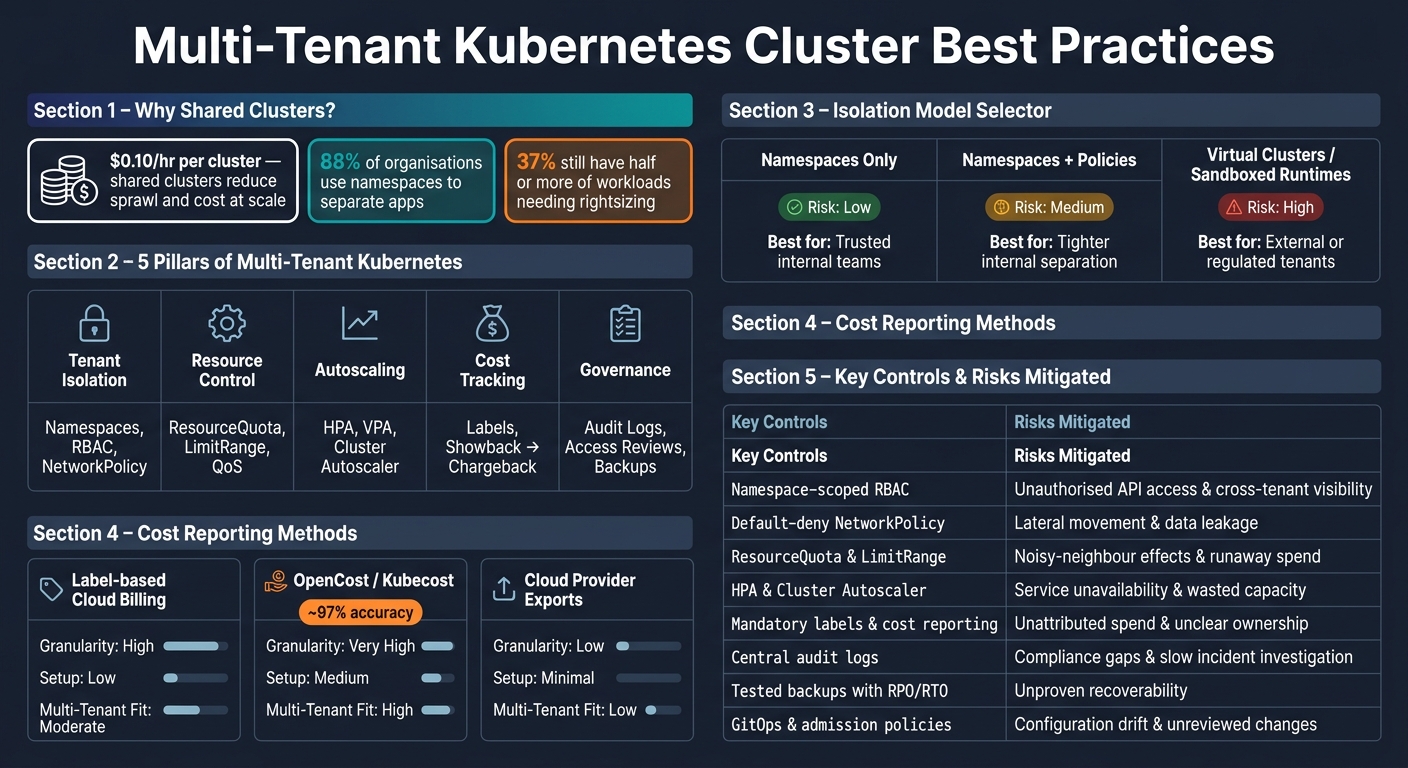 {Multi-Tenant Kubernetes: Controls, Risks & Cost Reporting Methods}
:::
{Multi-Tenant Kubernetes: Controls, Risks & Cost Reporting Methods}
:::
Tenant Autonomy & Isolation In Multi-Tenant Kubernetes Clusters - A Comprehensive Guide
Build tenant isolation with namespaces, RBAC and network policy
Once you’ve picked an isolation model, you need to enforce it in the cluster. That usually comes down to three things: namespace controls, traffic rules, and pod restrictions.
Use namespaces and naming standards to define tenant boundaries
Namespaces set the boundary for each tenant. They also scope RBAC, NetworkPolicies, and ResourceQuotas. A simple naming pattern like <tenant>-<environment> keeps things tidy - for example, tenant-a-prod and tenant-a-dev. It also makes quota assignment, usage reporting, and ownership tracking much easier [3][5][6].
Namespace names should stay unique across the fleet [3][5]. If a tenant uses more than one namespace, group those namespaces under a single policy object so quota and access rules stay aligned [4]. It’s also worth automating namespace creation through a GitOps workflow or Kyverno generate rules. That way, each new namespace starts with the right defaults already in place [5][6].
Restrict access with namespace-scoped RBAC and admission rules
For tenant workloads, stick with namespace-scoped Role and RoleBinding. Avoid ClusterRoleBinding, because it can expose cluster-wide metadata to tenant users [2][6].
A common setup is to give tenant teams the built-in edit role, while keeping quota and policy changes with the platform team [7][2][5]. That split is simple and helps prevent accidental overreach.
You can tighten things further with Kyverno or OPA Gatekeeper rules that block privileged workloads before they ever land in the cluster [7][5]. And it’s smart to check access from time to time with kubectl auth can-i --list --as=tenant-user. It’s a fast way to spot permission drift before it turns into a problem [7].
With access locked down, the next layer is traffic control.
Apply default-deny NetworkPolicies and restricted pod security
Start with default-deny ingress and egress policies in every tenant namespace. Then allow only what’s needed: DNS, same-namespace traffic, and approved shared services [5][2][7]. Use selectors instead of hardcoded namespace names, so policies keep working even as tenants come and go [5][2].
DNS rules matter more than people think. Miss them, and service discovery stops working [5][2].
Once traffic is isolated, pod security becomes the last line of defence.
Enforce the Restricted Pod Security Standard in tenant namespaces. This stops pods from running as root, using host networking, or mounting host paths [2][7]. If you’re rolling this out in an existing cluster, start with PSA audit or warn modes first. That gives you a clear view of which workloads would fail before you switch to enforce [1][7].
One more catch: NetworkPolicies only work if your CNI actually enforces them. Flannel does not [7][4].
With tenant boundaries in place, the next step is to cap CPU, memory, and scheduling per tenant.
Control resource allocation with quotas, limits and scheduling rules
Once tenant boundaries are in place, the next job is simple in theory and messy in practice: stop one tenant from eating all the shared CPU, memory, or storage. If you don’t, a single runaway workload can drain capacity, knock other tenants off balance, and turn the cluster into a headache.
Set ResourceQuota and LimitRange per tenant namespace
ResourceQuota puts a hard cap on a namespace. It limits the total CPU, memory, and storage a tenant can use. That matters in a shared cluster, because without quotas, one tenant’s runaway job can chew through shared capacity and cause incidents for everyone else [8][5].
LimitRange works one level lower, at the container level. It adds default requests and limits to pods that leave them out. That sounds small, but it saves people from a common failure. When a ResourceQuota is active, Kubernetes expects every pod to have resource requests set. If a developer forgets, the pod can fail admission. LimitRange smooths that out by filling in the blanks [5][8].
A practical way to size quotas is to use 30-day usage at the 95th percentile, then add 1.5x headroom. Apply those quotas before tenant namespaces are created. Also check that HPA settings line up with the quota. If maxReplicas × pod CPU limit is higher than the namespace quota, scale-outs can fail right when traffic spikes [5][8].
Use requests, limits, QoS classes and priority with care
Requests tell the scheduler what a pod needs to get placed on a node. Limits tell the runtime when to throttle it or kill it. In a shared cluster, that gap matters.
Kubernetes assigns one of three QoS classes based on those settings:
- Guaranteed: requests equal limits. These pods are the last to be evicted when a node is under pressure.
- Burstable: requests are lower than limits.
- BestEffort: no requests or limits at all. These are evicted first when resources run short [8][3].
BestEffort pods are a bad fit for shared namespaces. They have no scheduling guarantees and are first in line to be removed under pressure. Use PriorityClass so production workloads stay ahead of dev and batch traffic [3].
Separate node pools and storage tiers for mixed workloads
Not every workload should land on the same hardware. Latency-sensitive services, general-purpose apps, and batch jobs behave very differently. Put them all on the same nodes without clear rules, and you get noisy-neighbour issues that quotas alone won’t solve.
Use dedicated node pools, along with taints, tolerations, and affinity, to separate latency-sensitive, production, and batch workloads. Match storage classes to performance tiers as well. Databases should stay on fast volumes, while logs, backups, and batch data can sit on lower-cost storage. For GPU tenants, use MIG [3][8][1].
This leads straight into the next step: linking tenant usage to showback and chargeback.
Scale clusters and measure cost per tenant
Setting resource boundaries is only half the work. The other half is making sure the cluster scales in a sane way as demand moves around, and that you can see what each tenant is costing over time.
Tune autoscaling for shared-cluster scaling
In a multi-tenant cluster, autoscaling touches everyone. Use HPA for replicas, VPA for requests, and CA for nodes [11].
HPA maxReplicas needs to match the headroom available in the namespace quota. If it doesn’t, scale-outs can be blocked at admission [8]. On paper, the app can scale. In practice, it hits a wall.
For batch and async workloads, dedicated Spot node pools can cut costs by 70–90% against on-demand pricing [11]. Keep those pools away from latency-sensitive services with taints and tolerations. It also helps to enforce PodDisruptionBudgets, so services stay up during node draining and other cluster-level operations [12].
VPA needs a slow start. Run it in recommendation mode for the first 30 days before moving to auto mode [8]. That gives you a baseline first, instead of letting it make live changes to spiky workloads from day one.
Autoscaling only stays useful if usage can be tied back to each tenant.
Label workloads for showback and chargeback
Without steady labels, cost attribution turns into guesswork. Every namespace and workload should carry at least these labels:
-
tenant -
team -
environment -
cost-centre
Without them, cost allocation stays approximate. For UK organisations, mapping cost-centre straight to finance GL codes makes quarterly reporting much easier [8][7].
Enforce these labels at admission with a policy engine. That keeps the data clean enough to use for decisions, not just dashboards.
Start with showback, then move to chargeback once teams have had time to adjust [8][7].
These labels also help with governance, audit, and budget control.
That attribution still needs reporting tools. Labels on their own won’t do the job.
Use cost reporting to tie usage to budgets
Use tooling to turn labelled usage into reports. Three common reporting approaches are:
| Reporting Method | Granularity | Setup Effort | Multi-Tenant Suitability |
|---|---|---|---|
| Label-based (Cloud Billing) | High (resource level) | Low (tagging required) | Moderate; struggles with shared cluster overhead |
| OpenCost / Kubecost | Very high (namespace/pod) | Medium | High; provides around 97% accuracy and handles shared costs [8][12] |
| Cloud Provider Exports | Low (cluster level) | Minimal | Low; requires manual calculation to split by tenant |
OpenCost fits shared clusters well. It assigns costs at namespace and pod level with about 97% accuracy for on-demand node costs, and it spreads shared overhead such as control plane fees, DaemonSets, and monitoring [8][12].
For budget integration, tie resource increase requests to projected cost before approval [10]. Export per-namespace cost data to Grafana and send automated weekly summaries to team leads. Flag namespaces where requested resources are well above actual usage [10].
Those reports also help with onboarding, audits, and policy checks.
Governance, compliance and conclusion
Standardise onboarding, monitoring, backups and audits
Once you can measure usage, governance is what keeps controls consistent.
Cost reporting stays reliable only when tenant operations follow the same setup every time. Use one onboarding template for every tenant so namespace creation applies the same identity, policy, backup and observability defaults. That single template also keeps reporting, audits and restore tests in sync.
Under UK GDPR, audit logs should be kept centrally - a common pattern is 30 days in hot storage and 180 days in archive - with PII scrubbing applied before long-term storage [11]. Every policy change, quota update and tenant lifecycle event should show up in that log. That gives compliance reviewers a clear, attributable record instead of forcing them to rely on memory or informal notes.
Backup and restore tests need a schedule, not guesswork. Record RPO, RTO, success rate and per-tenant restore results each time. Access reviews should run on the same rhythm. Regular checks on ClusterRoleBindings, break-glass accounts, service accounts and group membership help spot privilege creep before it turns into a bigger issue.
Conclusion: combine isolation, resource control and cost visibility
Isolation, quotas, autoscaling, cost labels and governance only work when they operate as one system.
As the Kubernetes documentation puts it: If teams or their workloads can access or modify each others' API resources, they can change or disable all other types of policies thereby negating any protection those policies may offer.
[3] That is why access control sits underneath everything else.
The table below maps each control to the risk it removes:
| Control | Risk reduced |
|---|---|
| Namespace-scoped RBAC | Unauthorised API access and cross-tenant visibility |
| Default-deny NetworkPolicy | Lateral movement and data leakage between tenants |
| ResourceQuota and LimitRange | Noisy-neighbour effects and runaway spend |
| HPA and Cluster Autoscaler with guardrails | Service unavailability and wasted node capacity |
| Mandatory labels and cost reporting | Unattributed spend and unclear budget ownership |
| Central audit logs with tenant labels | Compliance gaps and slow incident investigation |
| Tested backups with documented RPO/RTO | Unproven recoverability and resilience risk |
| GitOps and admission policy enforcement | Configuration drift and unreviewed changes |
For organisations running regulated or higher-risk workloads, namespace isolation alone may not be enough. Virtual clusters or dedicated clusters give stronger separation when the risk profile calls for it [1][3][9]. Match isolation to risk, enforce controls the same way each time, and measure cost, performance and recoverability over time.
FAQs
When are namespaces not enough?
Namespaces deal with logical scoping and policy attachment. But they don’t give you security or hardware isolation.
That gap matters fast when you’re running AI or high-performance workloads, need tighter data sovereignty, or want protection from shared-kernel risk.
They also come up short when you need to:
- stop noisy neighbour problems
- reduce blast radius
- handle lots of namespaces without automation
In plain terms, namespaces are useful, but they’re not enough for stricter isolation or more demanding workload setups.
How do I stop one tenant affecting others?
Use a layered approach. Kubernetes does not provide strong isolation by default, so one control on its own usually isn’t enough.
Start with namespaces to separate tenants at a logical level.
Inside each namespace, enforce:
- RBAC
- default-deny Network Policies
- Resource Quotas and LimitRanges
- Pod Security Standards
For untrusted tenants, consider sandboxed runtimes or separate clusters if you need stronger isolation.
What labels do I need for tenant cost tracking?
Use consistent labels so you can tie costs back to the right teams, projects, or tenants. Namespaces are still the main unit for isolation and cost reporting, but labels give you a closer view of where money is going.
Common examples include tenant, team, and project. These labels make it easier to group spend with accuracy and support more detailed showback or chargeback reporting.