
Managing cloud costs is harder than ever. With businesses spending more on cloud services in 2026, controlling expenses is a priority. Choosing the right cost management tool can help you avoid budget overruns, reduce waste, and better predict future costs.
Here’s how to pick the best tool for your needs:
- Define your goals: Do you need multi-cloud visibility, Kubernetes cost tracking, or detailed department-level reporting?
- Set a budget: Tools range from free tiers to fixed pricing (e.g., £624/month) or percentage-based fees.
- Check core features: Look for forecasting, cost allocation, and dashboards tailored for finance and engineering teams.
- Test usability: Run a proof-of-concept to ensure the tool fits your workflows.
- Assess scalability: Ensure it handles growth and integrates with your existing systems like Jira or Slack.
::: @figure 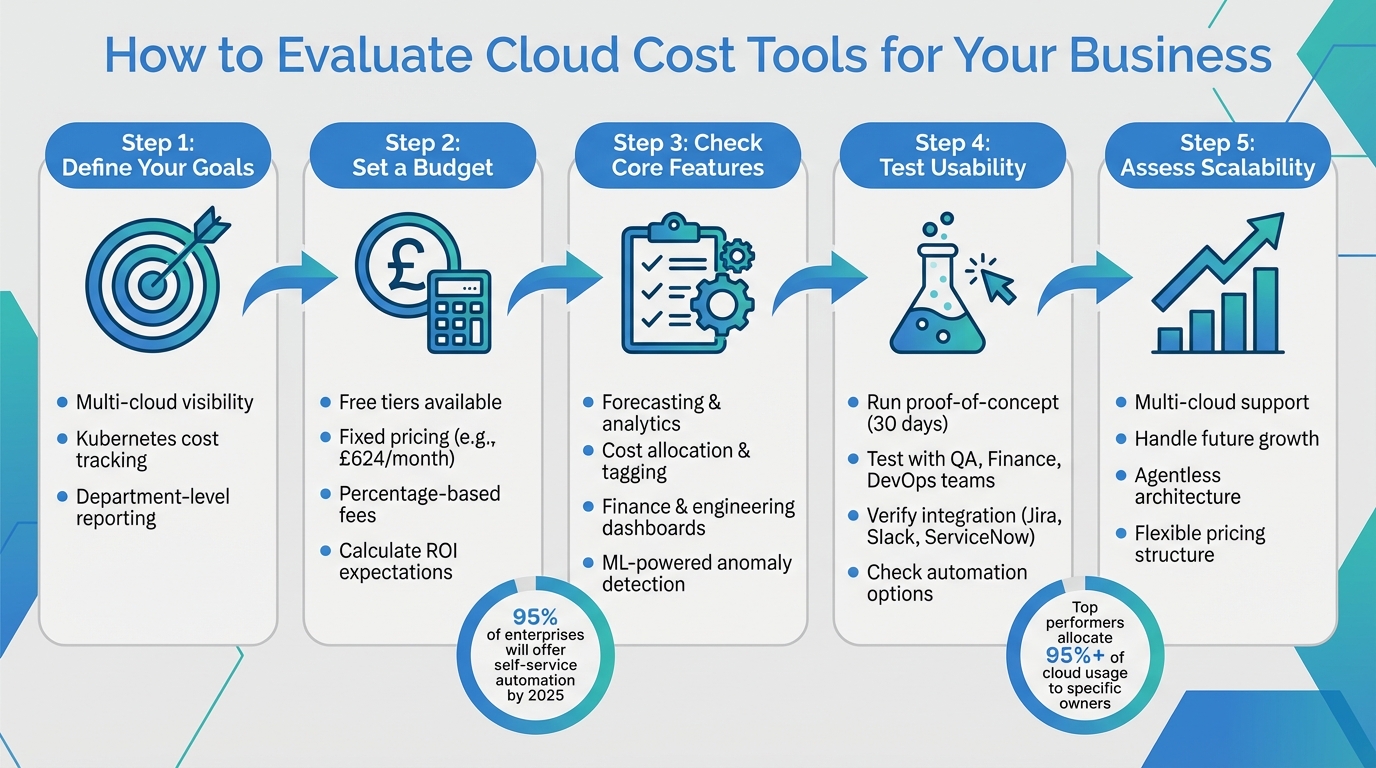 {5-Step Process to Evaluate Cloud Cost Management Tools}
:::
{5-Step Process to Evaluate Cloud Cost Management Tools}
:::
How To Choose Your Cloud Cost Optimization Platform
Define Your Business Requirements and Cost Goals
Start by outlining your goals and aligning them with your specific use cases. Are you trying to forecast spending for quarterly budgets? Do you need to monitor costs across multiple cloud providers like AWS, Azure, and Google Cloud? Perhaps you're managing dynamic Kubernetes clusters where expenses can fluctuate quickly, or you require department-level visibility to allocate costs precisely. Each of these scenarios demands particular features from your chosen cost management tool.
Identify Your Use Cases and Reporting Needs
The level of detail in your data matters. For dynamic environments like Kubernetes, hourly data is critical, as daily or weekly summaries might overlook sudden cost spikes [1]. For instance, Boeing leveraged Cloudaware to analyse Azure OpenAI token usage and track Savings Plan and Reserved Instance coverage, uncovering potential savings of approximately £767,000 annually [2]. Similarly, Caterpillar adopted a CMDB-driven FinOps platform to address tagging gaps and eliminate rightsizing inefficiencies, saving about £502,000 per year [2].
Pay attention to hidden costs, such as those lurking in Kubernetes pods, Snowflake usage, or untagged legacy resources. Running a proof-of-concept test can help you determine how well a tool identifies these hidden expenses [1].
Once you've got a clear understanding of your use cases, it's time to set your budget and define your return on investment (ROI) expectations.
Set Budget and ROI Expectations
Cloud cost management tools come with varying pricing structures. Some charge a percentage of your cloud spend, which can cause your management costs to rise alongside your cloud bill. Opting for tools with fixed, flat-rate pricing can offer more predictability [1]. For example, Harness Cloud Cost Management provides a free tier for up to 100 AWS resources, with premium plans starting at roughly £624 per month. CloudZero, on the other hand, begins at around £800 per month [2].
When calculating ROI, consider this: if a tool costs £10,000 annually but helps save £50,000, the return is clear. Also, factor in the time and resources needed for implementation and ongoing maintenance. Many organisations start with a showback approach - offering visibility through monthly reports without enforcing accountability - before moving to a chargeback model that automates billing and encourages direct accountability [1]. Choose a tool that aligns with your current cost management maturity rather than aiming for where you want to be in the distant future.
Assess Core Features and Functions
Once you've nailed down your requirements and budget, it's time to examine the features that truly matter. The focus here is on identifying tools that can deliver real, measurable benefits. Look for solutions that excel in forecasting accuracy, cost allocation, and dashboards tailored for both finance and engineering teams.
Forecasting and Analytics Features
Good forecasting goes beyond simply extrapolating historical data. The best tools leverage machine learning to spot trends and detect anomalies, like sudden cost spikes. To ensure the tool works well in your specific environment, consider running a 30-day live workload proof-of-concept [5].
Visibility alone doesn't fix anything. Seeing that your monthly bill jumped 20% tells you something, but not why it happened.- Cloudaware [3]
Modern platforms link cost analysis directly to the FinOps Inform
stage, bridging the gap between engineering decisions and financial outcomes [3].
Cost Allocation and Tagging Options
Predicting costs is only part of the equation. A robust tool must also allocate expenses clearly and transparently. Tagging plays a crucial role here. Top-performing organisations manage to allocate over 95% of their cloud usage to specific owners [6]. Teams with mature allocation practices also act 32% faster when it comes to implementing cost-saving measures [6]. A basic tagging structure might include fields like Owner, Project, Environment, CostCenter, and Application [7]. Tools that offer automated tagging or virtual tags
can help achieve 100% cost allocation [3][4].
Pay attention to how shared costs, such as NAT gateways, support fees, and shared storage, are handled. Clear rules for distributing these expenses across business units are essential [3][4]. Additionally, platforms that amortise savings from Reserved Instances and Savings Plans ensure the teams using these discounted resources see the financial benefits reflected in their reports [6].
You don't need complex models. You need consistent ones. The best driver is the one your teams already understand and trust.- Rob Martin, FinOps Architect, Adobe [6]
Dashboards and Reporting Features
Dashboards should cater to the unique needs of different teams. Finance teams benefit from executive summaries that highlight top variances, track forecasts against budgets, and summarise commitment utilisation. On the other hand, engineering and DevOps teams need insights into service-level changes, anomaly alerts sent to the right owners, and findings on Kubernetes over-requests [8].
Key metrics to monitor include allocation coverage (the percentage of spend mapped to owners), forecast variance (the difference between predicted and actual spend), and amortised effective rate (the true cost per unit after discounts) [8]. Automating report delivery via email, Slack, or Jira can save time and improve efficiency [8][4]. For businesses using multiple cloud providers, dashboards should normalise metrics across platforms like AWS, Azure, and Google Cloud into standard units [8][3]. Tools with Configuration Management Database (CMDB) integration can even map costs to actual assets and their owners, filling gaps when tags are missing [8][4].
With these metrics and features in place, the next step is ensuring the tool integrates smoothly into your existing processes.
Test Usability, Scalability, and Integration
Before selecting a cloud cost tool, it's crucial to see how it performs in real-world conditions. Testing ensures the platform aligns with your team's workflows, handles current workloads, and can grow alongside your business. Once you've identified the key features, put the tool to the test in practical scenarios.
Run Proof-of-Concept Tests
A proof-of-concept (PoC) is a great way to evaluate the tool using your own data and actual use cases. For example, check if business users can generate a report or take a cost-saving action within one hour - no coding required. Involve teams like QA, Finance, and DevOps to spot any usability issues. Set clear success benchmarks, such as requiring three users to complete five specific tasks within an hour. Afterward, gather formal feedback to decide if the tool meets your needs [9]. Once usability is confirmed, shift your focus to integration and automation to ensure the tool fits seamlessly into your workflows.
Check Integration and Automation Options
Make sure the tool works well with systems like ServiceNow, Jira, Slack, and Teams to embed cost insights into your team's daily processes [2][13][14]. Sync billing data with your CMDB to track every pound spent by service, owner, and environment [2].
Automation is another key factor. Look for features like shutting down idle resources, rightsizing instances, and enforcing budget policies automatically. AI-powered commitment management can also help maximise Reserved Instances and Savings Plan discounts [10][11][12][14]. By 2025, 95% of enterprises are expected to offer self-service automation, up from 84% in 2022 [13]. To build trust, start with read-only or recommendation-only automation before enabling active resource changes. Also, opt for agentless architecture to simplify deployment and keep infrastructure overhead low [12][14]. After addressing integration and automation, assess how well the tool handles future growth.
Evaluate Scalability for Future Growth
As your cloud usage grows, the tool must handle increasing complexity. Confirm it can maintain performance under heavier workloads and support multi-cloud environments [9][11][2]. Flexibility is equally important - check if you can customise dashboards, create allocation rules, or adjust reports without needing vendor support. Lastly, ensure the pricing structure scales sensibly, avoiding costs that balloon with every additional resource [2].
Compare and Select Your Tool
After completing your PoC tests and operational integration checks, it's time to compare the shortlisted tools in detail. A structured evaluation will help you weigh the features that matter most and make a well-informed decision.
Build a Comparison Table
Start by creating a comparison table to evaluate each tool against your key criteria. Consider factors like:
- Multi-cloud support: Does it work with AWS, Azure, GCP, and on-premises environments?
- Automation level: Does it offer recommendations only, or does it perform automated actions like AutoStopping idle resources?
- Data granularity: Are updates provided in real-time, hourly, or on a daily cycle?
- Cost allocation: Look for features like automated tagging, virtual tagging, and unit economics.
- Integration ecosystem: Check compatibility with tools like Jenkins, Jira, ServiceNow, and Slack.
- Pricing model: Is it based on a fixed fee, percentage, or performance?
Ensure the tool aligns with UK-specific reporting standards. Compare base plans and pricing structures to see if they fit your budget. Don't forget to check user reviews - CloudZero and Cloudaware both score 4.5/5 on Capterra, while Ternary achieves a higher 4.9/5 on G2 [3].
Pay attention to advanced features such as automated tag drift
protection, which ensures consistent reporting accuracy [3]. If immediate ROI is a priority, look for tools with AutoStopping features that power down idle resources, particularly useful in development and QA environments [15].
Once your table is complete, use it to objectively assess each tool and narrow down your options.
Make Your Final Decision Based on Your Priorities
With your comparison data ready, focus on your specific priorities to finalise the best tool for your needs. If cost savings are crucial, prioritise platforms offering advanced automation features like rightsizing and spot instance management. For businesses prioritising ease of implementation, opt for tools with agentless architecture that require minimal infrastructure changes.
If your workflows are DevOps-heavy, choose a tool with robust API support and CI/CD integration, allowing you to catch costly deployments before they hit production. Factor in the total cost of ownership, including hidden costs like implementation, training, and ongoing maintenance. This ensures the tool remains financially viable as your cloud usage grows.
Finally, confirm that the tool supports your financial reporting cycles - UK businesses, for example, should ensure compatibility with the April-to-March financial year. Use insights from your trials and gather feedback from your team to validate your choice before making the final decision.
Conclusion
From defining your needs to testing usability, this step-by-step approach forms the backbone of choosing a tool that aligns with your cost management goals. Picking the right cloud cost management tool starts with understanding your business priorities and cost objectives. Focus on the features that matter most to your operations - whether that's support for multiple cloud platforms, automated rightsizing, or real-time analytics. Make sure to conduct thorough proof-of-concept tests to see how well each tool performs in your specific environment.
As part of this process, think about how forecasting can complement your strategy. Use historical data for long-term budgeting while relying on predictive analytics for daily adjustments. This combination offers a balance of stability and adaptability, allowing you to address cost spikes before they impact your monthly budget. Automation can save time and improve accuracy, especially for tasks like resource tagging, rightsizing instances, and detecting anomalies.
If you're operating in the UK, ensure the tool supports GBP (£), UK date formats (dd/mm/yyyy), and complies with regulations like GDPR. These details are crucial for seamless integration into your workflows.
A FinOps approach - bringing together IT, Finance, and Operations - is key to effective cloud cost management. Start with clear tagging conventions, conduct regular audits (at least annually), and set up automated alerts at different thresholds (e.g., 50%, 80%, 100%) to avoid budget overruns. Tracking unit economics, such as cost per customer or transaction, can provide deeper insights into the value of your cloud spend beyond the total bill. These practices help ensure your cloud investment delivers measurable returns while keeping operations efficient.
Ultimately, choose a tool that grows with your business, delivers clear returns, and enhances operational efficiency. By following a structured evaluation process and focusing on your unique needs, you'll be well-equipped to optimise cloud costs and support your organisation's long-term success.
FAQs
What’s the quickest way to prove ROI from a cloud cost tool?
The quickest way to prove the value of a cloud cost tool is to start with an audit. This helps identify inefficiencies like unused resources or unnecessary spending. Once you've pinpointed these issues, you can take immediate action with automated solutions. For example:
- Auto-shutdown: Automatically turning off idle resources to avoid waste.
- Right-sizing instances: Adjusting resource allocations to better match your actual needs.
These changes can lead to noticeable cost reductions. By comparing the savings to your previous expenses, you gain clear proof of ROI. Aligning these results with your business objectives and budget makes the impact even more compelling.
How do I get accurate cost allocation if our tags are incomplete?
To keep cloud costs under control when dealing with incomplete tags, it's essential to automate and enforce tagging policies. This helps maintain consistency and reduces the chances of manual errors slipping through. Regular audits of resource tags and usage are also key - they allow you to spot and fix untagged or incorrectly classified resources.
Using tools that enable automated tagging, real-time monitoring, and policy enforcement can make a big difference. They streamline the process and ensure better accuracy and accountability when tracking cloud expenses.
What should I include in a 30-day proof-of-concept for our workloads?
A 30-day proof-of-concept (PoC) should focus on several key areas to ensure it meets your needs. Start with a resource audit to pinpoint inefficiencies in your current setup. Then, explore cost management features, such as real-time monitoring and automation, to see how well they align with your goals.
Make sure to perform integration checks to confirm compatibility with your existing systems. Use this phase to set budgets and configure alerts to identify any anomalies. Additionally, assess the tool’s reporting capabilities to ensure it provides detailed and actionable insights. Finally, test for scalability to confirm it can handle future growth while keeping costs under control.