
Managing Kubernetes costs across multiple clusters can be challenging, especially when fixed expenses and resource inefficiencies stack up. Here's how you can reduce costs effectively:
- Visibility: Map all clusters, workloads, and expenses. Use consistent labels (
team,env,cost-centre) and Kubernetes-specific tools like OpenCost or Kubecost for detailed insights. - Cluster Reduction: Consolidate clusters unless they meet strict compliance, isolation, or lifecycle needs. Use namespaces and policies instead of creating unnecessary clusters.
- Efficient Scaling: Standardise node pools (e.g., general-purpose, CPU-optimised, spot instances) and fine-tune resource requests using tools like Vertical Pod Autoscaler (VPA).
- Region and Pricing: Choose cost-efficient regions and leverage spot instances for non-critical workloads to save 60–90% on compute costs.
- Automation: Automate governance with tools like Open Policy Agent (OPA) or Kyverno to enforce cost controls, and clean up idle resources regularly.
::: @figure 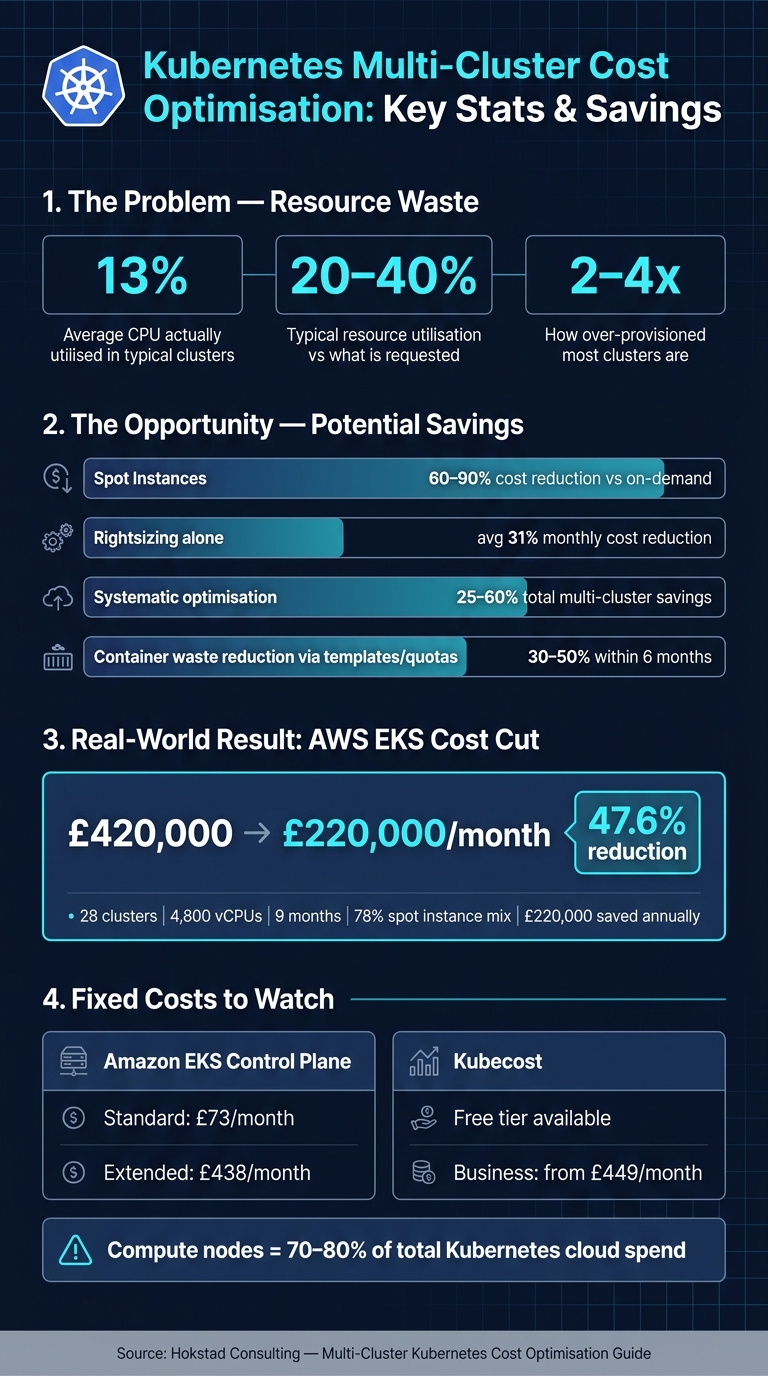 {Kubernetes Multi-Cluster Cost Optimisation: Key Stats & Savings}
:::
{Kubernetes Multi-Cluster Cost Optimisation: Key Stats & Savings}
:::
Kubernetes Multi-Cluster Consolidation Guide | Merge Clusters, Optimize Management & Reduce Costs
Getting Clear on Costs Across Clusters
Managing expenses in a multi-cluster environment starts with understanding where every £ is being spent. Costs are often spread across various providers, regions, and teams, so achieving visibility is the first priority.
Catalogue All Clusters and Workloads
Begin by mapping out all your clusters to get a clear picture of how costs are distributed. List each cluster, including its purpose - whether it's for production, staging, or development - its cloud provider, region, and estimated monthly cost. Keep in mind that compute nodes typically make up 70–80% of total Kubernetes cloud expenses[10]. Overlooking clusters can lead to wasteful spending, so this step is essential.
Set Up Cost Allocation Models
Once you've catalogued your clusters, assign ownership for each resource. Use a consistent labelling system with tags like team, cost-centre, product, and env across workloads, namespaces, and node pools[9][10]. Without consistent labels, cost data becomes unreliable. To maintain financial boundaries, set a ResourceQuota at the namespace level, capping the compute resources that each team can use[10]. Many organisations start with a showback
approach - where spending is made visible to teams - before transitioning to chargeback
, where teams are directly billed for their usage[11]. After this, adopt Kubernetes-specific tools to monitor costs effectively.
Use Kubernetes-Aware Cost Tools
Standard billing dashboards often fail to provide the Kubernetes-specific insights you need, such as details on pods, namespaces, or deployments. To address this, use tools built specifically for Kubernetes cost management. These tools, when combined with your inventory and allocation models, can transform raw cloud spending data into actionable insights at the workload level.
For single-cluster visibility, OpenCost is a free, open-source tool under the Apache 2.0 licence, supported by the CNCF[11]. For more advanced needs, Kubecost offers features tailored for multi-cluster environments. It includes federated data collection, reflects discounts like Reserved Instances and Savings Plans, and provides automated rightsizing recommendations[11][13].
| Feature | OpenCost | Kubecost |
|---|---|---|
| Licence | Open Source (Apache 2.0) | Commercial |
| Multi-cluster support | Limited | Fully supported (Federated ETL) |
| Discount reflection | Not supported | Reflects RI, Savings Plans, Spot[11] |
| Rightsizing recommendations | None | Automated[13] |
| Pricing | Free | Free tier; Business from £449/month[11] |
For organisations needing dashboards tailored to UK financial reporting cycles or specific internal chargeback models, Hokstad Consulting can configure these tools to provide customised insights for both finance and engineering teams. This clarity paves the way for further cost-saving strategies.
Reducing Your Cluster Footprint
Once you’ve established cost visibility, it’s time to scrutinise the necessity of every cluster. This ties back to earlier discussions on cost allocation and visibility, ensuring your resources are being used wisely.
Consolidate or Shut Down Clusters
Keep in mind the fixed cost of the control plane on Amazon EKS - £73/month for the standard plan and £438/month for the extended plan. These charges remain regardless of workload size [3]. When you multiply this across multiple clusters, the costs add up fast, even before factoring in duplicated expenses like observability agents, load balancers, and NAT gateways.
To determine which clusters are essential, use a four-point justification framework. A cluster should only exist if it meets at least one of these criteria:
- It’s required for strict compliance regulations (e.g., PCI-DSS or UK GDPR).
- It provides blast radius isolation for critical systems.
- It supports lifecycle independence, such as legacy workloads tied to older Kubernetes versions.
- It enforces a genuine trust boundary between environments.
Audits often reveal that 30–50% of clusters exist for outdated reasons [3]. In many cases, namespaces combined with strong RBAC policies and NetworkPolicies can achieve the required isolation without the need for a separate cluster. Reducing the number of clusters not only simplifies operations but also directly lowers fixed costs, making it a powerful lever in cost optimisation.
Pick Cost-Efficient Regions and Providers
The region you choose has a direct impact on expenses. For UK-based teams, AWS’s eu-west-2 (London) region is convenient and meets data residency requirements, but it’s usually pricier than nearby regions like eu-west-1 (Ireland). If your SLA can accommodate latency over 50ms, it’s worth comparing costs across adjacent regions instead of defaulting to London [4]. However, for workloads bound by FCA guidance or NHS data handling rules, the London region’s higher costs are often unavoidable and should be factored into your calculations.
Where compliance and latency allow, spot instances can lead to dramatic savings. These are ideal for fault-tolerant workloads like batch jobs, CI runners, and stateless microservices, offering cost reductions of 60–90% compared to on-demand pricing [6]. A good strategy is to reserve or commit to instances for baseline needs while using spot instances for burst workloads or non-critical tasks.
Standardise Node Pools and Workload Placement
Hidden costs often arise from an unstructured mix of node types that accumulate over time. Simplify by defining a small, standard set of node pools, such as:
- A general-purpose on-demand pool
- A CPU-optimised pool
- A spot instance pool
This approach makes it easier to manage spending and apply consistent autoscaling policies.
Assign workloads to the appropriate pool using Kubernetes taints, tolerations, and node affinity rules. For cost-based scheduling where flexibility is an option, use preferredDuringSchedulingIgnoredDuringExecution instead of hard requirements. This prevents pods from getting stuck if their preferred node type isn’t available [15]. Stateless and batch workloads are a perfect fit for spot instances, while on-demand instances should be reserved for control planes and stateful services where interruptions can’t be tolerated.
The results of these measures can be game-changing. For example, in September 2024, Senior DevOps Engineer Meena Nukala managed to cut a monthly AWS EKS bill from £420,000 to £220,000 - a 47.6% reduction - across 28 clusters and 4,800 vCPUs over nine months. A major factor in this success was shifting to a 78% spot instance mix, which saved £220,000 annually [7]. Standardising node pools and automating placement decisions made this shift feasible at scale.
Tuning Resources and Autoscaling
After streamlining your cluster setup and standardising node pools, the next step is to fine-tune resource usage within clusters to uncover hidden cost savings.
Right-Size Resource Requests and Limits
Over-provisioning pods is a common issue that leads to unnecessary expenses. Research shows that most Kubernetes clusters use only 20–40% of the resources they request, with a Google Cloud study revealing that just 13% of requested CPU in typical clusters is actually utilised [8].
To address this, analyse resource consumption over a 7–14 day period to capture both peak and off-peak usage patterns [16]. Instead of basing requests on the highest spike ever recorded, aim for the 90th percentile of observed usage. This approach reduces waste without significantly increasing the risk of resource shortages [16].
To automate these adjustments, deploy the Vertical Pod Autoscaler (VPA) in recommendation mode (updateMode: "Off"). This allows VPA to monitor usage and suggest optimal resource requests and limits without disrupting running pods [17][8]. Pairing VPA with Goldilocks simplifies this process further by consolidating recommendations across namespaces and clusters into a single dashboard, making it easier to implement changes at scale [17][8].
Most clusters are 2–4x over-provisioned - right-sizing saves 40–60% compute cost without risk.- Luca Berton, Principal Solutions Architect [17]
It's also important to configure Quality of Service (QoS) classes correctly. For stateful apps, set resource requests equal to limits (Guaranteed class) to prevent eviction. For stateless microservices, keep requests below limits (Burstable class) to handle traffic spikes efficiently. For workloads with unpredictable spikes, a CPU limit-to-request ratio of 4:1 and a memory ratio of 2:1 strikes a good balance between flexibility and efficiency [17].
Configure Pod and Cluster Autoscaling
Once resource requests are properly sized, align autoscaling settings to reflect actual demand. Use Horizontal Pod Autoscaler (HPA) for CPU-based scaling and VPA for memory management, but avoid applying both to the same metric to prevent conflicts [17]. To minimise thrashing
(frequent scaling up and down), configure the HPA stabilizationWindowSeconds to around 300 seconds [18].
As Jorijn Schrijvershof explains:
If a pod requests 1 CPU and uses 100m, HPA never scales it down - it is already at 1 replica with 10% utilisation. Rightsizing the request is the prerequisite.[8]
At the node level, the default Cluster Autoscaler (CA) settings often prioritise safety, leading to quick scale-ups but slower scale-downs. Adjusting these parameters can improve cost efficiency:
| Parameter | Default | Cost-Optimised | Effect |
|---|---|---|---|
scale-down-delay-after-add |
10 minutes | 2–5 minutes | Removes idle nodes faster [16] |
scale-down-unneeded-time |
10 minutes | 3–5 minutes | Identifies idle nodes more quickly [16] |
scale-down-utilization-threshold |
0.5 | 0.6–0.7 | Packs nodes more tightly [16] |
For AWS users, Karpenter can replace CA entirely. It offers faster provisioning (under 90 seconds from pending pod to ready node) and continuous automatic consolidation, in contrast to CA's more conservative node-group-based approach [14][16].
Cut Idle and Off-Hours Resource Usage
Reducing idle time is another way to lower costs. This is particularly impactful in non-critical development and test clusters. For UK teams, scaling workloads to match business hours (08:00–18:00 GMT) and reducing replicas during evenings, weekends, and bank holidays can significantly cut monthly expenses.
A simple way to achieve this is by using Kubernetes CronJobs to adjust replica counts during off-peak hours. For workloads that can handle it, KEDA (Kubernetes Event-Driven Autoscaling) can scale deployments down to zero when there's no traffic, eliminating unnecessary compute costs. Additionally, audit for orphaned persistent volumes - storage that remains attached even after the workloads using it have been deleted - to avoid incurring unnecessary charges.
To further optimise, consider using a descheduler to consolidate pods onto fewer nodes during low-traffic periods. This creates opportunities for the Cluster Autoscaler to terminate empty nodes, especially during overnight hours when workloads are lighter and disruptions are minimal.
Governance and Automation for Cost Control
Optimising pods and fine-tuning autoscaling are great first steps, but without proper governance, costs can spiral out of control again. New workloads might get deployed without resource limits, orphaned storage can pile up in namespaces, and unused clusters may linger unnecessarily. By embedding cost-awareness into your processes, you can avoid these recurring problems. Governance ensures cost control becomes a consistent practice throughout the cluster lifecycle.
Apply Admission Control Policies
Admission control allows you to intercept resource requests before deployment, making it a powerful tool for enforcing cost-related rules automatically. While earlier sections discussed the importance of consistent labelling and cost attribution, policy enforcement ensures these practices aren’t optional. Two popular tools for this are Open Policy Agent (OPA) with Gatekeeper, which uses the Rego language for complex rules, and Kyverno, which works directly with Kubernetes YAML and is often simpler to implement for budget-focused policies [9][11].
Start by enforcing mandatory labels like team, env, and cost-centre at the point of deployment, rejecting any pod that’s missing these tags [20]. Then, add policies to block the use of costly node types or limit deployments to specific regions. For even tighter cost control, Kyverno’s external data feature can integrate with a cost API like OpenCost. This allows you to deny pod creation if a namespace exceeds its budget - for instance, £5,000 per month [11].
A team that gets a Slack message showing their costs went from €4,200 to €6,800 in a week asks why. A team that can check a dashboard whenever they feel like it rarely does.- The Good Shell [20]
Standardise Cluster Templates
Ad hoc infrastructure creation often leads to unnecessary spending. To avoid this, standardise your clusters with reusable Infrastructure as Code (IaC) templates using tools like Terraform, Crossplane, or Helm. These templates should include cost-efficient defaults right from the start [5][9][19].
A good base template should define a ResourceQuota at the namespace level to cap CPU and memory usage and include LimitRange objects to set default resource allocations per pod. Add a Kubernetes cost tool to provide immediate cost insights [9][10]. Beyond the base, apply overlays tailored to specific environments: for example, development clusters might use aggressive scaling and consolidation, while production clusters prioritise uptime and availability. You can also define tiered node strategies - such as using reserved-critical nodes for production and spot-batch nodes for non-critical tasks - to cut node costs by 60–90% for eligible workloads [1][9][10].
Kubernetes is not expensive. Misconfigured Kubernetes is.- Opslyft [19]
By adopting structured cost management through templates and quotas, organisations often reduce container waste by 30–50% within six months [19].
Automate Clean-Up and Lifecycle Management
Over time, clusters tend to accumulate unused resources, which can inflate costs unnecessarily. Automate the detection and clean-up of waste, such as unused namespaces, orphaned PersistentVolumeClaims (PVCs), and idle LoadBalancer services. Scheduled scripts or tools can scan for Released PersistentVolumes, unmounted PVCs, and inactive services, enabling you to remove them efficiently [1][10]. Pair these clean-up routines with autoscaling adjustments to maintain cost discipline.
For non-production environments, tools like kube-downscaler can automatically scale deployments and StatefulSets to zero replicas outside business hours based on predefined schedules [21]. Similarly, short-lived clusters, such as those used for testing or feature branches, should have a TTL (time-to-live) policy applied at creation to ensure they are terminated automatically when no longer needed. Crossplane’s GitOps-style infrastructure management makes it easy to enforce this consistently across multiple cloud platforms [9][20].
| Resource Category | Detection Method | Recommended Action |
|---|---|---|
| Unused pods | Traffic threshold monitoring | Decommission or scale to zero |
| Over-provisioned pods | Request vs. actual usage gap | Adjust requests and limits
|
| Idle node capacity | Bin-packing analysis | Consolidate nodes via autoscaling |
| Unallocated storage | Unclaimed persistent volumes | Delete orphaned volumes or update policies |
If implementing this level of automation feels overwhelming, Hokstad Consulting offers specialised services in cloud cost engineering. They can help you build governance frameworks and set up the clean-up workflows described here, ensuring your infrastructure runs efficiently and without waste.
Conclusion: Making Cost Optimisation Part of Multi-Cluster Management
Keeping multi-cluster Kubernetes costs under control requires ongoing effort and attention. The strategies outlined here - boosting visibility, reducing unnecessary footprint, fine-tuning resources, and automating governance - are all interconnected steps that help maintain cost efficiency over time.
Research reveals a striking reality: clusters often utilise only 13% of their requested CPU while wasting 60–80% of allocated resources [8]. By consistently applying techniques like rightsizing and leveraging spot instances, organisations can cut multi-cluster expenses by 25–60% [9]. In fact, those who focus on systematic rightsizing alone report an average 31% reduction in monthly costs [6]. These numbers highlight the importance of maintaining strong governance throughout the Kubernetes lifecycle.
Kubernetes cost optimisation is an operational discipline that relies on robust tooling, team accountability, and regular FinOps reviews.- Md Sanwar Hossain, Software Engineer [2]
To stay on track, make it a habit to review idle costs weekly, adjust rightsizing monthly, and audit spot instance usage quarterly [8][12]. Pair these practices with automated governance and clean-up workflows to ensure cost-conscious operations are baked into your infrastructure's daily routine.
FAQs
Which clusters should remain separate, and which can be consolidated?
When strict requirements come into play - like compliance regulations (e.g., PCI standards or data residency laws), workload isolation for varying availability needs, or trust boundaries between legal entities - it's best to keep clusters separate. These scenarios demand clear separation to meet specific operational or legal standards.
However, for situations like separating teams or managing different environments, consolidation often makes more sense. In such cases, you can rely on tools and practices like namespaces, resource quotas, and RBAC (Role-Based Access Control) to manage multi-tenancy effectively. Alternatively, consider using tools like vCluster, which offers dedicated cluster isolation without the added complexity of managing multiple physical clusters.
How do we right-size requests and limits safely across many workloads?
To fine-tune requests and limits for multiple workloads safely, it's best to adopt a continuous, closed-loop strategy that balances performance with cost. A good starting point is using tools like Vertical Pod Autoscaler (VPA) in either recommendation or Off mode. This lets you analyse historical usage data without causing interruptions.
For CPU, set requests to cover the minimum requirements and configure higher limits to handle unexpected traffic spikes. When it comes to memory, keep requests and limits closely aligned to prevent instability or issues like OOMKills.
When should we use spot instances, and how do we manage interruptions?
Spot instances are ideal for stateless, fault-tolerant, or batch workloads, delivering cost savings of up to 90% compared to on-demand instances. For critical stateful services and the cluster control plane, it's better to stick with on-demand instances to ensure reliability.
To manage interruptions effectively, implement preStop hooks and SIGTERM handlers to enable graceful draining of resources. Additionally, set up fallback node pools to ensure workloads can be rescheduled without disruption. Use taints to isolate spot nodes, and apply pod tolerations to make workloads more resilient to potential interruptions.