
Managing Kubernetes costs can be challenging, but namespaces offer a way to divide clusters and improve cost visibility. Here’s how you can cut expenses and allocate costs effectively:
Standardise Namespace Design: Use consistent naming conventions (e.g.,
team-project-env) and enforce labels liketeamandcost-centreto track spending. Automate this process with tools like Kyverno or OPA Gatekeeper.Enforce ResourceQuotas and LimitRanges: Set limits on CPU and memory usage per namespace to prevent over-provisioning and unexpected costs. Define
LimitRangesfirst to avoid disruptions, and monitor usage to avoid hitting limits.Cost Allocation with Label Governance: Apply mandatory labels (
team,env, etc.) to all workloads for accurate cost tracking. Use tools like Kubecost to ensure less than 5% of costs remain unallocated.Separate Environments and Right-Size Resources: Keep development, staging, and production in separate namespaces to avoid resource conflicts. Scale down non-production environments during idle hours to save 40–60% on compute costs.
Automate Cross-Cluster Policies: Use tools like ArgoCD or Flux CD to enforce consistent policies across clusters. Admission controllers like Kyverno can block non-compliant workloads to prevent cost leaks.
Kubernetes Cost Allocation with Taints, Karpenter, KubeCost & Cost Explorer
1. Standardise Namespace Design Across Clusters
When managing costs in multi-cluster environments, having a consistent namespace design is crucial. Without it, cost data becomes fragmented, with each cluster using its own naming conventions, labels, and quota settings. This lack of uniformity makes it nearly impossible to track where the money is actually being spent.
To address this, adopt a one namespace = one team = one cost bucket
approach [3]. A naming convention like team-project-env (e.g., payments-checkout-production) can encode essential details such as ownership and environment type directly into the namespace name. This structure allows cost tools to aggregate data across clusters, providing a unified view of expenses [3][7].
Each namespace should also include a standardised set of labels, consistently applied across all clusters:
| Label Key | Example Value | Purpose |
|---|---|---|
team |
payments |
Links the namespace to its owning team [3][4] |
cost-center |
eng-402 |
Connects to finance codes for chargeback [3][2] |
environment |
production |
Differentiates costs by tier (e.g., prod, dev) [3][4] |
product |
analytics-api |
Groups resources for tracking at the product level [4][2] |
If these labels are missing, cost tools often categorise expenses as unallocated
, creating a gap in accountability and making chargeback nearly impossible [3]. Organisations that implement this level of visibility often see a 20–30% reduction in over-provisioning within just 90 days [3].
Kubernetes cost allocation is not a FinOps problem, it is a visibility problem. The waste is already there... visibility is what makes the decisions possible.- The Good Shell [3]
Once the labels are standardised, it's essential to enforce them consistently. Tools like Kyverno or OPA Gatekeeper can automatically reject namespace creations that don't include the required labels [3][7]. To maintain consistency, integrate these tools with a GitOps workflow using solutions like Flux CD or ArgoCD. This ensures that namespace manifests, quotas, and labels are version-controlled and applied uniformly across all clusters [8]. By doing so, you prevent manual drift and ensure accurate cost attribution.
Standardising namespaces is just the beginning - proper automation and quota enforcement naturally follow.
2. Enforce ResourceQuotas and LimitRanges Per Namespace
Once namespaces are standardised, the next step is enforcing resource usage constraints. While namespaces serve as organisational labels, they don't inherently restrict CPU or memory consumption [11]. Turning these labels into actual resource boundaries requires additional measures.
A namespace alone is a label, not a fence. Everything on this page exists to turn that label into actual isolation.- Jorijn Schrijvershof [11]
This is where ResourceQuotas and LimitRanges come into play. A LimitRange sets boundaries on what individual containers can request or consume, while a ResourceQuota limits total resource usage across the namespace. Together, they create a two-tier control system: one ensures individual pods operate within acceptable limits, and the other keeps the overall namespace usage in check [12].
Applying Limits in the Right Order
Always define a LimitRange before applying a ResourceQuota. Why? If a ResourceQuota is set first, any pod without explicit resource definitions will be rejected by the admission controller, potentially disrupting existing workloads. By establishing a LimitRange first, default values are automatically injected to satisfy the ResourceQuota requirements [10].
The Cost of Skipping Controls
Without these safeguards, resource waste and unexpected costs can spiral out of control. In fact, studies show that 60–80% of requested resources in Kubernetes clusters go unused because teams often overestimate their needs and fail to adjust them [11]. Even worse, a runaway job or forgotten load test can trigger the Cluster Autoscaler, adding unnecessary nodes and inflating costs [4][9]. For example, an Amazon EKS management plane costs approximately £0.10 per hour (around £57 per month), so uncontrolled scaling across clusters can quickly rack up expenses [9].
Suggested Quotas by Environment
Here’s a starting point for setting quotas, which can be adjusted based on your teams' typical usage patterns:
| Environment | CPU Request | CPU Limit | Memory Request | Memory Limit | Max Pods |
|---|---|---|---|---|---|
| Production | 20 cores | 40 cores | 40Gi | 80Gi | 200 |
| Staging | 8 cores | 16 cores | 16Gi | 32Gi | 50 |
| Development | 4 cores | 8 cores | 8Gi | 16Gi | 30 |
For production environments, include a 20–30% buffer above peak usage to handle rolling updates, which temporarily increase the number of pods [10][11]. Additionally, explicitly cap services.loadbalancers and requests.storage, as these correspond to costly cloud infrastructure like load balancers and storage volumes, which are often overlooked [12][10].
Proactive Monitoring
To stay ahead of potential issues, use kube-state-metrics to set up alerts. These can notify teams when a namespace reaches 85% of its quota, giving them time to adjust before hitting the limit [10][11]. This ensures smoother operations and helps prevent unexpected disruptions or costs.
3. Namespace-Based Cost Allocation and Label Governance
Building on a structured namespace design and enforced quotas, establishing clear label governance is crucial for assigning cost accountability. While quotas and limits help control resource usage, label governance ensures spending is tied to the correct teams or projects. To achieve this, apply a mandatory label contract across all namespaces and workloads. At a minimum, labels like team, cost-center, env, and owner should be included [3][14]. Without these labels, tracking and attributing costs becomes impossible.
To enforce this, implement label policies at the admission stage using tools like Kyverno or OPA Gatekeeper [3][17]. This approach prevents resources from being created without the required labels. Retrofitting labels later is not only inefficient but also prone to errors. By enforcing labels from the start, you ensure complete cost attribution from day one.
Resources without these labels are rejected at admission time. This ensures 100% of workloads are attributable from day one rather than retroactively chasing unlabelled pods.- Tasrie IT Services [9]
With proper label governance in place, tools such as Kubecost can effectively aggregate and allocate costs across clusters. This ensures every expense is tied to the appropriate team or department [3][18]. A good benchmark to aim for: keep unallocated costs below 5% of your total bill and resource waste under 20% [14]. If unallocated costs exceed 10%, it’s a clear sign that your label governance needs attention [3].
To maintain awareness, consider automating weekly Slack summaries that display each team's namespace spending and waste percentages. This method reduces the need for manual reporting while keeping teams informed [13][14].
4. Separate Environments by Namespace and Right-Size Resources
Combining development, staging, and production in a single namespace can lead to unnecessary resource conflicts. For instance, if a development batch job runs out of control or a memory leak occurs, it could impact production environments – a situation often referred to as the noisy neighbour
problem [4]. Creating separate namespaces for each environment establishes clear boundaries, reducing these risks and enhancing overall visibility.
Namespaces without quotas are an open bar. One team's memory leak, runaway batch job, or forgotten load test becomes every other team's production incident.- Amanpreet Kaur, Zop.Dev [4]
A major benefit of this approach is the ability to right-size resources for each environment. Production environments demand high availability, larger resource limits, and on-demand instances, while development typically does not. Running a development namespace continuously with excessive resources can lead to significant inefficiencies. By applying specific ResourceQuotas to each environment, you can ensure resources are allocated appropriately and prevent waste. This tailored approach also sets the foundation for automation to further optimise resource use.
Here’s a suggested starting point for setting ResourceQuotas across environments:
| Environment | CPU Request | Memory Request | Max Pods |
|---|---|---|---|
| Production | 20 cores | 40Gi | 100 |
| Staging | 8 cores | 16Gi | 50 |
| Development | 4 cores | 8Gi | 30 |
These Day One
quotas provide a practical baseline for namespace-specific resource allocation [4].
In addition to quotas, automating scale-to-zero during idle times is an effective way to cut costs. Tools like kube-downscaler can automatically scale down development and staging deployments to zero replicas after working hours (e.g., from 20:00 to 07:00 on weekdays) [15][19]. For example, a staging environment that runs continuously but is only used for about 50 hours per week wastes nearly 70% of its compute costs [19]. Scaling down non-production environments during off-hours can reduce non-production expenses by 40–60% [15].
Even idle namespaces can generate costs. For instance, a forgotten LoadBalancer service might still incur charges of around £13–£14 per month, even if it’s not actively routing traffic [6]. To avoid these silent expenses, it’s essential to regularly audit your cluster. Using commands like kubectl get pods -A can help identify empty namespaces, and checking for unused Persistent Volume Claims can prevent unnecessary charges from piling up.
5. Apply Cross-Cluster Namespace Policies With Automation
Once you've set up namespace standards and enforced quotas, the next challenge is scaling these policies across multiple clusters. Without automation, things like inconsistent labelling, missing resource quotas, and unmanaged namespaces can quickly derail cost management efforts as your infrastructure grows. This is where automation tools, especially admission controllers, come into play to ensure consistent policy enforcement at scale.
Admission controllers like Kyverno (a CNCF-graduated project as of March 2026) and OPA Gatekeeper are designed to automatically block workloads that don't comply with your policies. For example, they can reject namespaces missing required labels like cost-centre or team. Kyverno takes it a step further by using generate rules to automatically create default settings - such as ResourceQuotas, LimitRanges, and deny-all NetworkPolicies - whenever a new namespace is created. This eliminates the need for manual configuration and ensures uniformity across your clusters [16].
Multi-tenancy is not a single feature you toggle on. It is a layered discipline that touches namespaces, RBAC, networking, resource management, pod security, and cost allocation.- Tasrie IT Services [9]
To extend this automation across all clusters, tools like ArgoCD and Flux CD are invaluable. These GitOps solutions synchronise namespace configurations - including RBAC rules, resource quotas, and network policies - from a central Git repository, ensuring consistent governance across your entire fleet [20]. Additionally, integrating a cost-estimation tool into your CI/CD pipeline allows teams to predict the financial impact of policy changes before deployment [3].
| Automation Tool | Primary Function | Cost Benefit |
|---|---|---|
| Kyverno / OPA Gatekeeper | Admission control and label enforcement | Prevents untracked cost leaks [5] |
| ArgoCD / Flux CD | GitOps policy deployment across clusters | Maintains consistent governance at scale [20] |
| Karpenter | Node provisioning and workload consolidation | Achieves 60–80% savings with spot instances and bin-packing [15] |
| VPA (Auto mode) | Automatic resource request right-sizing | Reduces waste from over-provisioning [15] |
Bringing automation into cross-cluster namespace management ensures that your policies are consistently applied, no matter how large your infrastructure becomes. For organisations seeking expert guidance on implementing these strategies, Hokstad Consulting offers tailored DevOps transformation and cloud cost engineering services.
Comparison Table
::: @figure 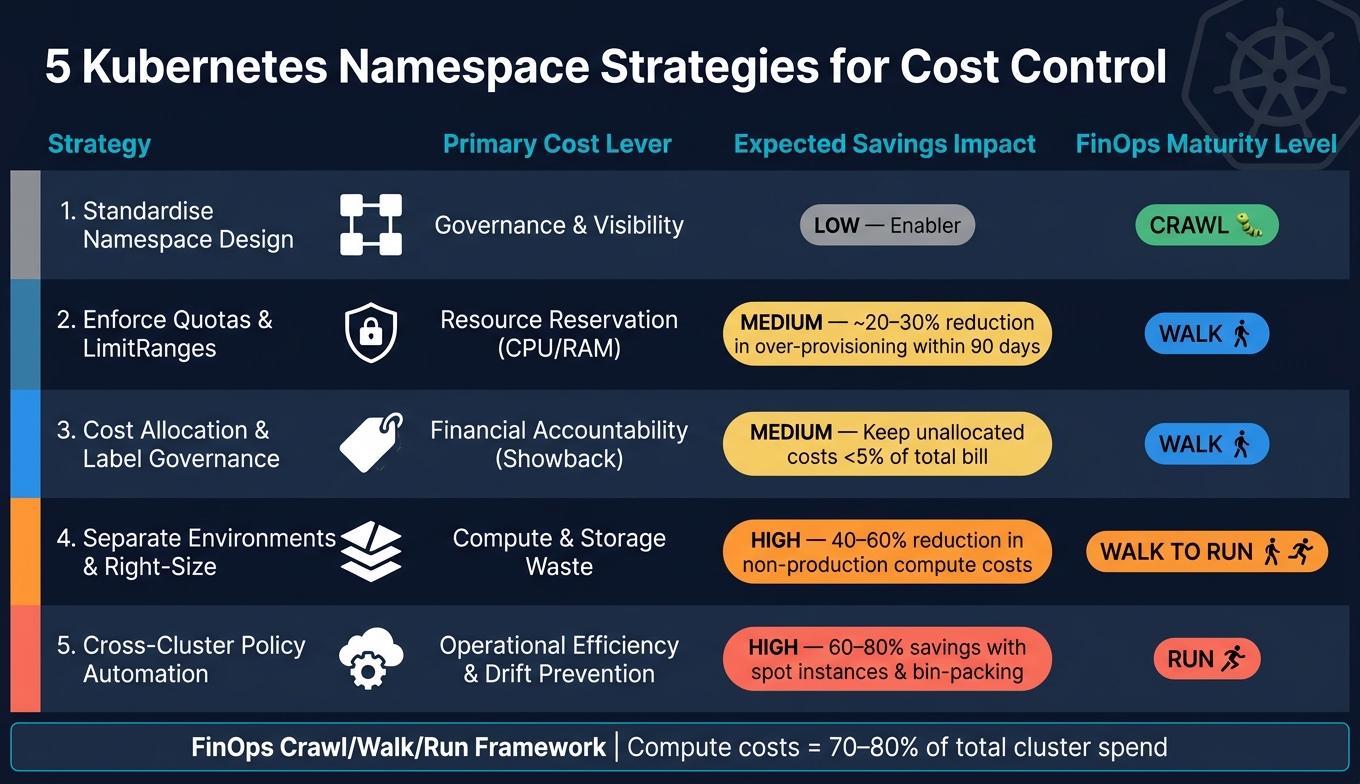 {5 Kubernetes Namespace Strategies for Cost Control: FinOps Maturity & Savings Impact}
:::
{5 Kubernetes Namespace Strategies for Cost Control: FinOps Maturity & Savings Impact}
:::
Strategies for managing Kubernetes costs differ in their returns and how ready organisations are to adopt them. The table below highlights each strategy's primary cost lever, the potential savings impact, and the maturity level needed for implementation, using the FinOps Foundation's Crawl/Walk/Run framework.
| Namespace Strategy | Primary Cost Lever | Expected Savings Impact | Maturity Required |
|---|---|---|---|
| 1. Standardise Namespace Design | Governance & Visibility | Low (Enabler) | Crawl |
| 2. Enforce Quotas & LimitRanges | Resource Reservation (CPU/RAM) | Medium | Walk |
| 3. Cost Allocation & Label Governance | Financial Accountability (Showback) | Medium | Walk |
| 4. Separate Environments & Right-Size | Compute & Storage Waste | High | Walk to Run |
| 5. Cross-Cluster Policy Automation | Operational Efficiency & Drift Prevention | High | Run |
This table illustrates how maturity levels influence cost optimisation strategies. For instance, standardising namespace design is a foundational step that ensures accurate cost attribution and prepares teams for more advanced measures like enforcing quotas or managing cost allocation.
Under the FinOps Crawl/Walk/Run framework, strategies 2 and 3 are practical starting points. They bring noticeable improvements in cost accountability, with better cost allocation reducing over-provisioning by an estimated 20–30% within 90 days [3]. These steps establish a solid base for implementing more advanced cost control measures.
The gap between 'we know K8s costs too much' and 'we can tell you exactly who's spending what' is enormous.- SpendArk [1]
On the other hand, strategies 4 and 5 deliver the highest savings through precise right-sizing and cross-cluster automation. However, they demand advanced tools for observability and strong organisational commitment. Since compute costs typically make up 70–80% of total cluster spend [15], addressing environment separation and automation early can significantly impact overall savings.
Conclusion
Managing Kubernetes costs across multiple clusters can be tough, but these five namespace strategies provide a structured way to tackle it. A standardised namespace design improves visibility, while setting ResourceQuotas and LimitRanges helps establish clear spending limits. By implementing strong label governance and accurate cost allocation, you can break down your cloud bill into actionable, team-specific insights. The combination of environment separation and resource right-sizing plays a key role in maintaining control over costs.
Right-sizing resources alone can lead to noticeable savings [15]. By applying these strategies, you’ll bring your multi-cluster environment closer to operational efficiency and tighter cost management.
Take it step by step using the FinOps Crawl/Walk/Run framework. Even small actions, like enforcing mandatory labels with tools like Kyverno or OPA, can significantly improve cost attribution.
For expert advice on optimising Kubernetes costs, check out Hokstad Consulting.
FAQs
How do I choose the right namespace structure for my teams?
To figure out the best namespace structure, think about factors like your team size, how complex the project is, and how much isolation is needed. For most production environments, a namespace-per-team-per-environment model tends to be the most effective. It provides solid isolation and makes tracking costs easier.
If you're part of a smaller organisation, a namespace-per-environment setup might suit you better, as it allows for more efficient sharing of resources. On the other hand, medium-sized teams often find a namespace-per-team structure simpler to manage, especially for handling RBAC (Role-Based Access Control).
To keep things organised and optimise costs, stick to a consistent naming convention like {team}-{application}-{environment}. This makes management much smoother in the long run.
What quotas and limits should I set without breaking workloads?
To avoid potential disruptions, start by measuring resource usage before imposing any constraints. Use a LimitRange to define default requests and limits, ensuring pods automatically align with the necessary requirements. Once you’ve established the baseline usage, apply ResourceQuotas to restrict overall namespace consumption effectively.
Monitor resource metrics over a seven-day period. For CPU requests, aim for the 95th percentile of usage and add an extra 20% as a buffer. For memory, set requests at the 99th percentile. To allow for safe bursting, configure limits to be 2–3 times higher than the request values.
How can I reduce 'unallocated' Kubernetes costs to under 5%?
To keep unallocated Kubernetes costs under control and below 5%, it’s crucial to implement a few key practices:
- Enforce workload labelling: Ensure every workload is labelled based on team, project, or cost centre during admission. This allows for clear tracking and accountability.
- Namespace-based allocation: Assign ownership by mapping each namespace to a specific team. This creates a direct link between resources and their responsible parties.
- Shared resource cost distribution: For resources like monitoring tools, divide costs proportionally among the teams using them to ensure fairness.
- Regular audits for idle resources: Routinely check for and remove unused items such as orphaned volumes, idle LoadBalancer services, and completed jobs. These can quietly inflate costs if left unchecked.
By combining these approaches, you can achieve more accurate cost attribution and significantly reduce unallocated expenses.