
Want to protect your data on Google Cloud from disasters? GCP snapshots are an efficient way to back up your data and recover quickly from outages or deployment errors. This guide explains the five key steps to set up and manage GCP snapshots for disaster recovery.
Here's what you'll learn:
- Plan your strategy: Define RPO (data loss tolerance) and RTO (recovery speed).
- Create manual snapshots: Learn how to take your first snapshot using the Console or
gcloudCLI. - Automate snapshot schedules: Save time and ensure consistency with automated schedules.
- Test disaster recovery: Regularly restore snapshots to verify your recovery process works.
- Control costs: Use retention policies, labels, and archive snapshots to manage storage expenses.
Why it matters: Snapshots help you meet recovery targets, whether you're dealing with critical databases or compliance requirements like UK GDPR. Follow these steps to secure your data and avoid downtime.
::: @figure 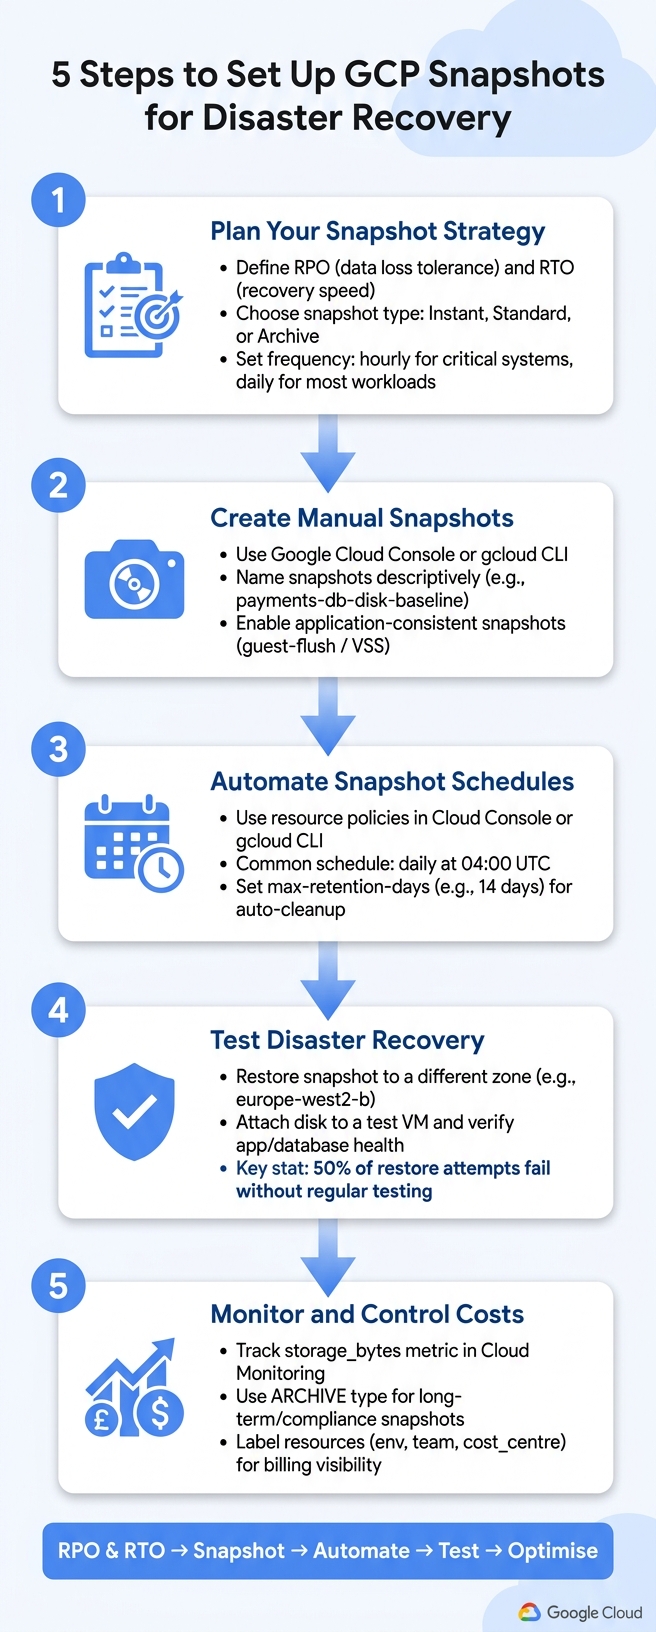 {5 Steps to Set Up GCP Snapshots for Disaster Recovery}
:::
{5 Steps to Set Up GCP Snapshots for Disaster Recovery}
:::
Google Cloud Business Continuity & Disaster Recovery | Hands-on Backup & DR Lab | Day 15
Need help optimizing your cloud costs?
Get expert advice on how to reduce your cloud expenses without sacrificing performance.
Step 1: Plan Your GCP Snapshot Strategy Around Recovery Goals
Before diving into creating snapshots, it’s crucial to have a well-thought-out plan. This ensures you avoid wasting resources while maintaining adequate protection for your data.
Define Your RPO and RTO
Start by identifying your Recovery Point Objective (RPO) and Recovery Time Objective (RTO). These two metrics are the backbone of your snapshot strategy:
- RPO determines how much data loss you can tolerate. For instance, if your RPO is one hour, you’ll need to take snapshots at least every hour [8].
- RTO defines how quickly you need your systems restored after an incident [7].
Your snapshot schedule and type depend heavily on these objectives. A tighter RPO means more frequent snapshots, while a stricter RTO requires faster recovery options. Here’s how different snapshot types compare:
| Snapshot Type | Characteristics | Geo-Redundant |
|---|---|---|
| Instant | Fastest recovery, but not geo-redundant | No |
| Standard | Balanced recovery speed with geo-redundancy | Yes |
| Archive | Lower cost, suited for compliance but slower to restore | Yes |
Once you’ve set your recovery goals, the next step is deciding which disks to protect and where to store the snapshots.
Choose Which Disks to Protect and Where to Store Snapshots
Focus on protecting disks that store critical application data. Secondary disks are usually the priority, as boot disks often hold transient data with limited recovery value [5].
For UK-based organisations, data sovereignty is an important consideration when choosing storage locations. If you need to guard against regional outages, multi-regional storage spreads your snapshots across multiple locations. Keep in mind that this comes with higher costs and potential network charges for cross-region recovery [7]. On the other hand, regionally scoped snapshots keep metadata and snapshots in the same region, offering tighter security and access control compared to global snapshots.
With your storage needs in mind, the next step is to establish a snapshot schedule.
Set Snapshot Frequency and Retention Periods
Your snapshot frequency should match your RPO. For most workloads, daily snapshots work well, but critical systems like payment services or databases with tighter RPOs may require hourly snapshots. Distribute snapshots evenly across the day - critical disks can be snapshotted up to six times per hour [5][7].
Equally important is setting a retention policy. Without one, snapshots can pile up indefinitely, leading to soaring storage costs. The minimum retention period is one day [6]. Snapshots remain available even after their retention period until replaced by newer ones, ensuring you always have a recovery point [6].
For databases and stateful workloads, use application-consistent snapshots to capture pending writes. On Linux, this involves guest-flush, while on Windows, it requires VSS (Volume Shadow Copy Service). These operations must complete within 300 seconds to avoid failure [4][9].
Step 2: Create Your First Manual Snapshots
Once your snapshot strategy is in place, the next step is to create your first manual disaster recovery snapshots. These snapshots act as a baseline, allowing for efficient incremental backups. They’re also incredibly useful before performing high-risk tasks like applying patches or major software updates, as they provide a reliable restore point in case something goes wrong [12].
Creating Snapshots in the Google Cloud Console
To create a snapshot using the Google Cloud Console, navigate to Compute Engine → Snapshots → Create Snapshot and follow these steps:
- Name the snapshot clearly: Use a descriptive name, such as
payments-db-disk-baseline. - Choose the Snapshot type: Select
STANDARDfor disaster recovery orARCHIVEfor long-term storage at a lower cost. - Select the Source disk: Pick the specific disk you want to back up.
- Set the Location: Opt for Multi-regional for added resilience or Regional for tighter control over data location. This is especially important for UK organisations managing data sovereignty requirements.
- Enable application consistency: Tick the box for Enable application consistent snapshot to ensure pending writes are flushed before the snapshot is taken [4].
- Create the snapshot: Click Create to finalise the process.
If you manually specify a storage location during this process, it will override your project's default snapshot settings for that specific instance [11].
Creating Snapshots with the gcloud CLI
For those comfortable with command-line tools, the gcloud CLI offers more flexibility and is ideal for scripting. Use the following command:
gcloud compute snapshots create payments-db-baseline \
  --source-disk=payments-db-disk \
  --source-disk-zone=europe-west2-a \
  --storage-location=europe-west2 \
  --snapshot-type=STANDARD \
  --guest-flush \
  --labels=env=production,team=platform \
  --description="Baseline snapshot before Q2 deployment"
- The
--guest-flushflag ensures application consistency for Windows and supported Linux systems [10]. - Use the
--labelsflag to tag snapshots, making them easier to organise and filter as your collection grows. - Add the
--asyncflag if you prefer the command to return immediately, allowing you to monitor the snapshot progress separately [10].
Once the snapshot process begins, you can resume heavy workloads as soon as the resource status changes to UPLOADING or READY [5].
Common Mistakes to Avoid
When creating disaster recovery snapshots for the first time, certain errors are common and can disrupt the process.
- Insufficient permissions: Ensure the user or service account executing the command has both
compute.snapshots.createandcompute.disks.createSnapshotpermissions. Missing either will result in failure [2]. - Snapshotting during high I/O periods: Taking snapshots during peak activity without quiescing the application can lead to crash-consistent snapshots, which may require file system journal replay during restoration [1]. Aim to create snapshots during off-peak hours - early mornings are often better than midnight, which is a busy time for many scheduled operations [1].
- Simultaneous snapshots on the same disk: Avoid running multiple snapshots on the same disk at the same time. Allow the first snapshot to finish so subsequent snapshots can use it as a baseline. Exceeding six snapshots per disk within an hour will trigger a
RESOURCE_OPERATION_RATE_EXCEEDEDerror [1].
With manual snapshots successfully created and these common pitfalls avoided, you’re ready to move on to automating snapshot schedules in Step 3.
Step 3: Set Up Automated Snapshot Schedules
Once you've mastered manual snapshots in Step 2, it's time to automate the process. Automating snapshot schedules not only saves time but also ensures consistent protection, reducing the risk of human error.
While manual snapshots are useful for one-off backups, they lack the reliability needed for effective disaster recovery. By automating schedules, you guarantee regular recovery points without relying on manual intervention.
The easiest way to achieve \[taking a snapshot once per hour\] is to set up a snapshot schedule.- Google Cloud Documentation [5]
Setting Up Snapshot Schedules in the Console
In Google Cloud Console, snapshot schedules are managed through resource policies. These policies specify how often snapshots are taken, how long they are kept, and their storage location. To set up a schedule:
- Go to Compute Engine > VM instances.
- Select your VM and click on the specific disk under Storage.
- Click Edit and choose Create a schedule under the Snapshot schedule section.
You can configure schedules to run hourly, daily, or weekly. A common practice is setting a daily schedule at 04:00 UTC, balancing cost and recovery needs. Remember, start times must align with the hour in UTC (e.g., 04:00 is valid, but 04:13 is not) [3].
Automating Snapshots with gcloud CLI and OpenTofu/Terraform
For a more structured and repeatable setup, use the gcloud CLI or OpenTofu/Terraform. Here's how to automate snapshots with the gcloud CLI:
# Create the snapshot schedule
gcloud compute resource-policies create snapshot-schedule prod-daily-snapshot \
  --region=europe-west2 \
  --max-retention-days=14 \
  --on-source-disk-delete=keep-auto-snapshots \
  --daily-schedule \
  --start-time=04:00 \
  --storage-location=europe-west2 \
  --snapshot-labels=env=production,team=platform

# Attach the schedule to a disk
gcloud compute disks add-resource-policies payments-db-disk \
  --resource-policies=prod-daily-snapshot \
  --zone=europe-west2-a
The --on-source-disk-delete=keep-auto-snapshots flag ensures snapshots remain intact even if the original disk is deleted [3]. For OpenTofu/Terraform users, you can define the schedule with the google_compute_resource_policy resource and attach it using google_compute_disk_resource_policy_attachment. This approach ensures consistent configuration across multiple environments.
Managing Retention and Cleanup
To control costs and simplify management, use the --max-retention-days option (e.g., 14 days), which automatically deletes snapshots older than the specified timeframe. Adding labels to the schedule helps with cost tracking and filtering [3][13]. As Sophia Yang, Product Manager at Cloud Asset Inventory, notes:
Scheduled snapshots also mean you no longer need to manage snapshot cleanup yourself. You can define the retention policy within the same schedule, and the system will automatically delete the snapshots.[15]
For disks encrypted with a Customer-Managed Encryption Key (CMEK), all snapshots created by the schedule will automatically use the same encryption key, requiring no additional setup [3].
With automated snapshots and retention policies in place, you're ready to move on to validating your disaster recovery strategy in the next step.
Step 4: Test Your Disaster Recovery by Restoring Snapshots
Automated snapshots are only useful if they work when you need them. But here's the catch: research shows that 50% of restore attempts fail, and 60% of backups are incomplete [18]. Regularly testing your restores is the only way to ensure your Recovery Point Objective (RPO) and Recovery Time Objective (RTO) targets are achievable.
How to Restore a Disk from a Snapshot
Restoring a disk from a snapshot is straightforward. In the Google Cloud Console, head to the Snapshots page, locate the snapshot you want, then navigate to Disks > Create new disk. Set the Source type to Snapshot, pick your snapshot, and configure the disk’s name, type, and target zone. Remember, the new disk must be at least the same size as the original. Anything smaller, and the process will fail [16].
Prefer scripting? The gcloud CLI makes it quick and repeatable:
# Create a new disk from a snapshot in a recovery zone
gcloud compute disks create payments-db-recovery \
  --source-snapshot=payments-db-snapshot-20260516 \
  --zone=europe-west2-b \
  --type=pd-ssd

# Attach the disk to a test VM
gcloud compute instances attach-disk recovery-test-vm \
  --disk=payments-db-recovery \
  --zone=europe-west2-b
Once the disk is attached, you’ll need to mount it. On Linux, this is done manually. On Windows, if the snapshot was created with Volume Shadow Copy Service (VSS), use diskpart and run attr volume clear readonly to enable write access [9][16].
After restoring and mounting the disk, use it to validate your disaster recovery process through a structured test.
Conduct a Basic Disaster Recovery Test
Disaster recovery (DR) testing doesn’t have to be complicated. The aim is to simulate a failure and measure how quickly you can recover - this defines your actual RTO [7].
Here’s a simple way to test:
- Pick a recent snapshot.
- Restore it as a new disk in a different zone from your production environment (e.g.,
europe-west2-binstead ofeurope-west2-a). - Attach the disk to a dedicated test VM.
- Mount the disk and verify that your application and database are working as expected.
Check database connections, confirm that application logs show a clean startup, and ensure external integrations are responding as they should. It’s during these tests that you might uncover hidden issues - such as expired certificates, stale secrets, or misconfigured endpoints [17].
One thing to keep in mind: crash-consistent snapshots capture the state of the disk but don’t account for pending transactions. For high-transaction systems like databases, this may mean the application needs to replay its journals during startup, which can add to your RTO. If this is a concern, consider using guest-flush scripts on Linux or VSS-integrated snapshots on Windows for a more consistent state [5].
These tests are invaluable for identifying gaps and improving your recovery strategy.
Common Restore Mistakes to Avoid
Testing is where mistakes often surface. Avoid these common pitfalls:
- Restoring to the failed zone: If the original zone is down, recovery won’t work. Always restore to a different zone or region [16].
- IAM permission issues: The account performing the restore must have
compute.disks.createandcompute.snapshots.useReadOnlypermissions. Missing either will block the operation [16][5]. - Snapshot frequency limits: Google Cloud allows only six new disks per hour per zone from a single snapshot. In a crisis, hitting this limit could delay recovery [5].
- Cross-region costs and delays: Restoring a snapshot to a different region incurs network egress charges and can increase your RTO due to data transfer times [7]. If you rely on regionally scoped snapshots for compliance, factor these into your DR plan.
Only 50% of businesses test disaster recovery plans yearly.- Cloud Carib [18]
For UK organisations, ignoring DR testing is a gamble. With 93% of businesses experiencing extended downtime closing within a year, it’s a risk no company can afford [18]. Make testing a regular part of your schedule - don’t leave recovery to chance.
Step 5: Automate, Monitor, and Control Snapshot Costs
Now that your disaster recovery (DR) process is validated, it's time to shift your focus to keeping operations efficient and controlling costs over the long term. Once your DR testing is reliable, the next step is ensuring your snapshot setup runs smoothly without requiring constant manual intervention or leading to unexpected expenses.
Managing Snapshots with OpenTofu/Terraform
Using tools like OpenTofu or Terraform helps maintain consistent snapshot configurations. For instance, you can use google_compute_resource_policy to define snapshot schedules (e.g., hourly, daily, or weekly) and attach these schedules directly to your Persistent Disks. For manual pre-deployment backups, pair this with google_compute_snapshot, allowing you to keep your entire snapshot setup in version-controlled code [19][20].
To track costs effectively, apply labels such as business_unit, env, and cost_centre to every snapshot resource. These labels make it easier to filter Cloud Billing reports and identify exactly how much each team or project is spending on snapshot storage in GBP [19][21]. Without labels, costs can quickly become unclear, especially as your environment grows.
Also, configure the on_source_disk_delete behaviour to either KEEP_AUTO_SNAPSHOTS or APPLY_RETENTION_POLICY. This ensures that snapshots don't get orphaned if a disk is deleted [6].
Monitoring Snapshot Operations and Setting Alerts
To keep an eye on your snapshot operations, use Cloud Monitoring to track the compute.googleapis.com/snapshot/storage_bytes metric. This helps you identify any unexpected growth in storage usage. It's equally important to set up alerts for failed snapshot operations since unnoticed failures could leave a gap in your DR plan when you need it most [13][14].
You can also verify that your scheduled policies are running as planned by using the following gcloud command:
gcloud compute snapshots list \
  --filter="sourceDisk:payments-db" \
  --sort-by="~creationTimestamp" \
  --limit=10
This command provides a quick overview of recent snapshots for a particular disk, helping you confirm that schedules are working correctly. Regular checks like these are key to avoiding unnoticed issues [5].
| Operation Status | Snapshot Resource Status | Meaning |
|---|---|---|
PENDING |
No resource exists | Request is queued |
RUNNING |
CREATING |
Snapshot creation in progress |
RUNNING |
UPLOADING |
Created but not yet saved; safe to resume apps |
DONE |
READY |
Complete and available for use |
DONE |
FAILED |
Snapshot creation failed |
Controlling Snapshot Costs for UK Organisations
Google Cloud Platform (GCP) snapshots are incremental, meaning you're only charged for the blocks that have changed since the last snapshot, not the entire disk size. However, costs can still rise if retention policies and storage locations aren't carefully managed [19][13].
For organisations in the UK, it's advisable to store snapshots in europe-west2 (London) using regional storage. This option is more cost-effective than multi-regional storage and ensures data stays within the UK, which is essential for organisations subject to UK GDPR or industry-specific data residency requirements [11][2]. In Terraform, explicitly set storage_locations = ["europe-west2"] to avoid relying on defaults.
For data that needs to be retained long-term but rarely accessed - such as compliance snapshots taken at the end of each quarter - switch to snapshot_type = "ARCHIVE". Archive snapshots are cheaper than standard ones and are ideal for retention-focused use cases rather than frequent DR testing [19][2].
| Snapshot Type | Best For | Storage Cost | Parameter |
|---|---|---|---|
| Standard | Regular DR, frequent restores | Higher | snapshot_type = "STANDARD" |
| Archive | Long-term retention, compliance | Lower | snapshot_type = "ARCHIVE" |
If your team manually manages cloud costs, consider consulting experts in cloud cost optimisation. For example, Hokstad Consulting has helped organisations cut cloud spending by 30–50%, including optimising storage configurations like snapshot policies. By fine-tuning your snapshot strategy alongside a robust DR plan, you can boost both resilience and cost efficiency in your GCP setup.
Conclusion: Building a Reliable Disaster Recovery Plan with GCP Snapshots
A solid disaster recovery plan with GCP snapshots boils down to five essential steps. Skipping even one can leave your recovery strategy vulnerable.
To move from a reactive approach to a proactive one, automate snapshot schedules and use application-consistent backups (like guest-flush) to safeguard database workloads. Regularly testing your restores is critical - snapshots that haven’t been tested can’t guarantee successful recovery when you need them most.
For organisations in the UK, storing snapshots in regional locations such as europe-west2 aligns with GDPR requirements while keeping costs down compared to pricier multi-regional options. Combining standard snapshots for active disaster recovery with archive snapshots for long-term storage ensures you avoid overpaying for infrequently accessed data.
Managing multiple projects can complicate snapshot policies, IAM permissions, retention rules, and cost labelling. If this feels overwhelming, expert guidance can make a big difference. Hokstad Consulting specialises in creating tailored disaster recovery plans, streamlining cloud infrastructure, and automating tasks like snapshot management. Their clients have cut cloud expenses by 30–50%, with no upfront costs for cost-reduction projects.
FAQs
How do I choose between standard, instant, and archive snapshots?
Standard snapshots are incremental and stored across multiple geographic locations, making them excellent for long-term backups. They remain accessible even if the original disk is deleted and provide quicker recovery options.
Instant snapshots, on the other hand, are temporary and stored in the same region as the original disk. They deliver the fastest recovery times but are removed when the source disk is deleted.
Archive snapshots are a budget-friendly choice for long-term storage. While they support storage across multiple locations, recovery times are slower compared to other options.
Do GCP snapshots replace database backups for DR?
Snapshots in Google Cloud Platform (GCP) are a handy tool for backup and disaster recovery, as they capture the state of disks at a specific moment. However, they aren't a substitute for proper database backups. This is because snapshots might not maintain consistency for transactional databases, which can lead to potential issues during recovery. To ensure reliable database restoration, additional steps are necessary to safeguard data integrity.
What should I measure during a snapshot restore test?
When performing a snapshot restore test, it's crucial to check data integrity and consistency. This means ensuring that the restored data is both complete and accurate, aligning with the expected state. Pay special attention if the snapshot was designed to be application-consistent, as this adds another layer of precision to verify.
Additionally, track key metrics like restore time, success rates, and any errors encountered during the process. These insights help confirm that the restoration process is not only reliable but also fast enough to meet the requirements of your disaster recovery plan.